
Return to the Therran Scenario Page
Summary:
The party has recovered a map showing the location of the headquarters of the infamous Green Arrows bandit group. They now must raid the lair in order to complete the destruction of the band and to find out who helped with the attempted rescue of Aramith, the leader of the Green Arrows.
Assumptions:
The party is in the employ and/or service of House Riverine and has completed the scenario "Witness Protection" and has found the map hidden on Lieutenant Broscus' person.
Note: This scenario includes assumptions that the bandits in "Witness Protection" have keys to their personal possessions on their persons (usually on a leather thong around their necks). However, these keys are not specifically mentioned in that scenario. Therefore, DMs running both scenarios should either describe the presence of the keys on the bandits in that scenario, or simply assume that the PCs found the keys and gathered them up and have brought them with them to the raid on the Bandit Lair.
Location:
The northern half of the Far Coast.
Historical Date:
Early 23 N.S. (5537), Late Winter or Early Spring.
GM's Introduction:
Refer to the introduction to the scenario entitled "Witness Protection". This is a sequel designed to carry the events of that scenario to their conclusion and to bridge between that adventure and the investigation of the Dwillingir Thieves' Guild as presented in "To Catch a Thief".
In the previous scenario, Aramith, the leader of a notorious band of bandits called the Green Arrows, had been captured. He was due to be transported to Dwillingir from Aldervel in order to stand trial and public execution by the Imperator and Provincial Governor. Fearing a rescue attempt by Aramith's fellows, three transport caravans were sent out from Aldervel, two decoys and one real. It was hoped that by sending out two false caravans, the chances that Aramith would arrive at Dwillingir were greatly increased and that, given the fact that it was more likely than not that the bandits would be risking their lives on a false caravan, the bandits wouldn't even bother with a rescue.
Unfortunately, the secrecy of the caravans had been compromised, for Aramith had a secret arrangement with the Dwillingir Thieves' Guild, and dealt with them on many occasions, and it was feared his torture and questioning in Dwillingir would break him and he would divulge his connection with the Thieves' Guild.
Moreover, the head of the Dwillingir Thieves' Guild is none other than a doppelganger who is, simultaneously, impersonating Barnabus, the Trade Lord of House Riverine in Dwillingir. The doppelganger is very worried that should Aramith talk, the heat would be on the Thieves' Guild, and this could lead to the authorities finding out about the doppelganger and his impersonation of Barnabus.
So, the doppelganger used bribery and coercion to turn traitor some of the Imperial soldiers who would guard the caravans. He also determined which of the three would hold the prisoner. He then leaked this information to the Green Arrows so that they could affect a true rescue.
In addition, the false Barnabus hired powerful assassins to, in the event the rescue failed, kill Aramith to keep him from talking.
Finally, to cover his tracks in this matter, the doppelganger sent some of his own men (the party) to help guard one of the caravans. The party was supposed to be given to one of the false caravans, to keep them out of harm's way and from using their talents to thwart the rescue and assassination attempts…
However, another interested party is involved in this matter. For Barnabus' wife, the Lady Abrinda, is also not whom she seems. She is a succubus, sent by House Mercur (and ultimately, House Vrielsevri of the drow) to infiltrate House Riverine. This succubus quickly found out, using her powers, that a doppelganger had replaced her husband. This irked her to no end, for the doppelganger was able to resist her wiles and was not as easily manipulable as her real husband. What's more, the doppelganger is not as adept at trade, and the demoness is quite suspicious as to its motives and as to who sent it to replace Barnabus in the first place.
She desires to investigate and thwart this doppelganger and ultimately cause its downfall. When she determined that her erstwhile husband was anxious about Aramith's capture and that he had bribed the soldiers at Aldervel and intended to rescue Aramith or have him slain, she was intrigued. Clearly, she reckoned, if it was so important for the doppelganger to stop Aramith from being transported to Dwillingir, then it was likely in her best interest to see that very thing happen. To this end, in disguise, she seduced the leader of the traitorous soldiers and convinced him to station the PCs with the real prisoner caravan instead of with one of the decoys. The succubus hopes that the PCs are talented enough to see Aramith to Dwillingir.
Now the events of "Witness Protection" have occurred, and the party has found the map hidden on the person of Lieutenant Broscus, or Aramith has been tortured in Dwillingir and, before his execution, told where the current hideout is located.
In either case, the party now must raid the lair, rout the bandits, and ultimately learn of the connection with the Dwillingir Thieves' Guild.
Part One - The Start:
There are several outcomes to "Witness Protection" that will have some effect as to the start of this scenario. These are presented below.
A. The party successfully transported Aramith to Dwillingir but did not find Broscus' map:
Aramith will be tortured and questioned for a week or so. Early in the questioning, the location of his lair will turn up. At this time, the PCs will summoned by the Imperator, who will assign them the task of eradicating the bandit lair. The Imperator, shaken by the treachery of Lieutenant Broscus and his men, will not wish to use Imperial Soldiery for this task, as he is not certain which soldiers are compromised and which are loyal. He will, however, possibly put any surviving soldiers from the caravan in "Witness Protection" under the command of the PCs, since he is sure of their loyalty (the DM can assign these soldiers to the party if he feels the PCs need some help handling this scenario).
The Imperator will remark that he believes Aramith is telling the true location of the camp, or at least his chief interrogator believes so.
B. The party finds Broscus' map:
If the party finds Broscus' map, they can follow it to the bandit lair. As it is unlikely that the PCs will do this until they see their duty in escorting Aramith to Dwillingir to its completion, the timing of their following the map might be based on the ultimate fate of Aramith.
If Aramith escapes, the PCs have the option of immediately heading to the lair. The DM should ignore any background information regarding the Imperator and simply run the lair. If, however, the PCs still elect to return to Dwillingir first to report, then the Imperator will request their aid in raiding the lair.
If Aramith is slain en route to Dwillingir, then the PCs again have the option of immediately heading to the lair or stopping at Dwillingir first. The consequences of these two choices are as detailed above.
C. The party neither escorts Aramith safely to Dwillingir nor finds Broscus' map.
Technically, the PCs have no way to find the lair if this circumstance comes about. A DM desirous to run this scenario could simply have the Imperator somehow get his hands on a map to the lair (via one of his agents, or perhaps amongst Broscus' personal possessions left back in Aldervel).
In cases A and B, the Imperator will urge the party to haste, lest the bandits that remain give up all hope for their leader and scatter to the winds. He will offer the PCs a bounty of 50 gp per bandit slain, and the same for any brought in alive (showing that he has no interest in any further Green Arrow captives other than Aramith).
The Doppelganger's Reaction:
Should the party return to Dwillingir before heading to the bandit lair, the false Barnabus will be none to pleased that the PCs are going after the bandit lair. He is worried that they may find something there tying the Thieves' Guild to the Green Arrows. This will be less of a worry if Aramith is captured, as that information will have already been forthcoming from his torture. Nonetheless, the doppelganger now wants to thwart the PCs. He will send out a group of hired thugs to try to slay the PCs. This is the only action he will take, as he is far too smart and subtle to attempt to directly thwart the party's raid in any way. The doppelganger will know the initial route the PCs take by sending out a House member to observe the PCs departure, and whether they follow the Imperial roads or cut directly across country towards Hosfel Orchard. Of course, if the PCs then deviate from their route, then the thugs will have to track them.
These thugs will be paid mercenaries the doppelganger knew in his wandering days before he settled down in Dwillingir, and the mercenaries do not know that they work for a doppelganger. They simply know that off and on for the last 10 years they have done dirty work for a man named Simmon, who apparently is very mysterious but also quite wealthy and who rewards them well for services rendered.
Fortunately for the doppelganger, this band of thugs was in the vicinity and "Simmon" has directed them to make all haste to overtake the PCs. The thugs will know where the party is headed, and they will have a description of the group and be briefed on their capabilities by the doppelganger. As such, they will set try to set up a nice ambush and tailor their tactics according to the PCs' known abilities.
The thugs are mounted on light warhorses, though they are not expert riders. They will generally pursue and attack from horseback. They will try to take the time, if possible, to bind the wounds of their fallen, though the leader will not do so.
Although these riders ideally wish to set up an ambush, they are not experts in stealth, especially when mounted. As such, a wary party of PCs should stand a decent chance of spotting them. The thugs will essentially be tracking the PCs...not using the Track feat constantly, but occasionally to make sure the PCs are travelling in a straight line. If the PCs stick to the roads, then the thugs will ride quickly ahead of the PCs and set up a roadside ambush. They will be off of their horses in this case and hidden in the brush to either side of the road. If the PCs flee the ambush the thugs will mount up and pursue (their horses can be assumed to be a good 100 yards away from the abush site).
On the other hand, if the PCs are going cross country, then the thugs will likely not be able to set an ambush, as they do not know the precise route of the party. In this case, they will likely simply pursue the party and attempt to catch up to them using the speed of their horses. They will push their mounts, even to the death, to try to catch the PCs, though not if less than half their number cannot keep up and only if their leader is present. In pursuing, the party can possibly spot the horsemen from a distance and be ready for the assault or even set up an ambush of their own.
Note: This encounter is EXTREMELY difficult. It is meant to be. The doppelganger knows the PCs. He knows their capabilities. And he will hardly send out a group of people incapable of killing the PCs. However, these thugs are simply mercenaries out for pay. As such, they are unlikely to fight to the death...or even close to the death. Once their leader falls, when a quarter of their number are down and most of the rest are severely injured (over 50% hit points lost) they are likely to flee the field. Even should their leader remain standing, they are likely to flee if the battle is clearly going against them. Furthermore, each individual mercenary is likely to flee the combat if in immediate danger of dying or being brought to negative hit points that would mean they bleed to death in a few rounds.
|
* Mercenary Thugs (12): Male human Rogue 1/Fighter 2; CR 3; Medium humanoid (human); HD 1D6+2 plus 2D10+4; hp 21; Init +3; Spd 30 ft; Space 5 ft; Reach 5 ft; AC 16 (touch 11, flat-footed 15); Atk +5 melee (1D8+2, battleaxe) or +3 ranged (1D6, shortbow); SA sneak attack +1D6; SQ trapfinding; AL NE; SV Fort +5, Ref +3, Will +1; Str 14, Dex 13, Con 15, Int 12, Wis 13, Cha 8. Height 6 ft 1 in. Skills and Feats: Balance +7, Bluff +3, Hide +5, Intimidate +4, Jump +11, Listen +7, Move Silently +5, Ride +5, Sense Motive +3, Spot +9, Tumble +8; Alertness, Blooded, Dodge, Mobility, Weapon Focus (battleaxe). Possessions: studded leather armour, heavy wooden shield, battleaxe, shortbow, arrows (20), dagger, belt pouch, traveler's outfit, 16 cp, 14 sp, 4 gp. |
|
* Mercenary Leader: Male human Barbarian 1/Fighter 4; CR 5; Medium humanoid (human); HD 1D12+3 plus 4D10+12; hp 45; Init +1; Spd 40 ft; Space 5 ft; Reach 5 ft; AC 15 (touch 11, flat-footed 14); Atk +10 melee (2D6+1D4+6, masterwork greatsword) or +6 ranged (1D6+3, javelin); SA rage 1/day for 8 rounds; AL CE; SV Fort +9, Ref +2, Will +2; Str 17, Dex 13, Con 16, Int 10, Wis 12, Cha 10. Height 6 ft 4 in. Skills and Feats: Climb +7, Intimidate +6, Jump +5, Listen +5, Ride +5, Spot +3, Survival +6, Swim +5; Dirty Fighting, Dodge, Power Attack, Track, Weapon Focus (greatsword), Weapon Specialization (greatsword). Possessions: masterwork greatsword, chain shirt, traveler's outfit, javelins (4), silver necklace with amber (250 gp), copper Mergurr charm (15 gp), belt pouch, dagger, 16 cp, 45 sp, 120 gp. |
|
* Light Warhorses (13): CR 1; Large animal; HD 3D8+9; hp 22; Init +1; Spd 60 ft; Space 10 ft; Reach 5 ft; AC 14 (touch 10, flat-footed 13); Atk +4 melee (1D4+3 [x2], hooves) and -1 melee (1D3+1, bite); SQ low-light vision, scent; AL N; SV Fort +6, Ref +4, Will +2; Str 16, Ref 13, Con 17, Int 2, Wis 13, Cha 6. Length 7 ft. Skills and Feats: Listen +4, Spot +4; Endurance, Run. Possessions: saddle, bit and bridle, saddlebags. |
Where's Aramith?:
In all events, Aramith is not present at the lair. If he was escorted to Dwillingir, he is being tortured and will be executed. If he was slain en route, then he is still quite dead. If he was rescued, then he, suspecting that his capture was orchestrated by one of his underlings, will not return to the lair, but will make for a secret safehouse only he knows of and then make haste quickly out of the Province altogether, for he realizes that his days as a bandit leader in this neck of the woods are over.
Part Two - The Map and the Journey:
The Map:
The map found on Lieutenant Broscus is not a direct map to the bandit lair. They were not foolish enough to leave such obvious evidence in the hands of Broscus. Instead, the map is part decoy and part real.
The map itself, on its surface, purports to show the location of the bandit lair. In actuality, this is the lair of a green hag. The bandits learned about the green hag lairing in their vicinity and so have used it as a ruse on their maps to lure unsuspecting pursuers to their deaths. The green hag of course has learned about these maps but has no reason to object to this inadvertent means of gaining food and wealth.
The bandit lair is located roughly 45 miles west by northwest of Aldervel, within the confines of the Feyindir Forest just east of Haldon's Wash. The terrain here is rocky and sloped, being part of the foothills that lead west to the Aynayjor Mountains.
The map shows the location of the hag's lair (masquerading as the bandit lair), which is some 5 miles to the southwest of the actual bandit lair.
The map also shows, as a point of reference seemingly on the way to the bandit's lair, a stone obelisk. The obelisk is an ancient construct of the Thaneeri, but recently carved into its base is the key to finding the true location of the bandit lair.
Should the PCs instead be sent to the area by Aramith, he will also lead them astray, directing his torturers verbally to the obelisk and thence to the hag's lair. In essence, the torturers will then provide the PCs with a map from that description that basically mirrors Broscus' map in every significant manner.
In all cases then, the PCs will, at first, be headed for the hag's lair.
It is in the hag's lair that they will likely find evidence to guide them to the obelisk and the actual bandit lair.
The map is presented below:
The script "Find the base and find the base each hidden behind" refers to the backside of the base of the obelisk.
The Journey:
The journey to the eaves of the forest can be as eventful or uneventful as the DM likes. It is late winter or early spring, so likely there is a chill in the air and occasional light snows or rain. Frost is on the ground in the morning, and if in winter, is also on the ground in patches at all times, especially in the lee of rocks or other shadows. The air is crisp and sharp.
One event that may occur on the journey has already been presented above. The mercenary band hired by the doppelganger may attack the party. Refer to that section for details.
The party is directed by the map to begin at the junction of the Urgramm River and Haldon's Wash, just outside of Spiralle. Should the party enquire around Spiralle, they will hear little of useful rumours, though an exceptional Gather Information check (DC 25) will gain them a story from an old man about a green witch who haunts the area of the Wash and kidnaps and eats children who stray into the woods, especially after dark. Younger and "wiser" villagers will scoff at this legend.
Once at the junction of the rivers, where the Wash burbles into the Urgramm in a frothing rapid, the party is directed to follow the Wash southwest.
After traveling a good 45 miles along the Wash, the party will come to the obelisk.
The Obelisk:
The obelisk stands on a small hillock, overgrown with trees. The thing is covered in moss and vines of ivy grow around it. The thing is crudely carved, certainly no work of expert craftsmen or masons such as dwarves, and the runes and pictographs that run up its front face are clearly of ancient Thaneeri origin if examined closely by any who speak Thaneeri or with suitable Decipher Script abilities.
The runes tell the tale of one of the Great Grandsons of Thaneer named Hargosh. This son gave up a good deal of his wealth and birthright to marry a woman named Yavrossa who was a member of a family with whom his was feuding. Expelled from his clan and cut off from his birthright, the son went through great trials and tribulations to win over the heart of the woman's father and win her hand.
Alas, a short time later Hargosh returned from a hunt to find his woman in bed with another man…a man from his original clan. Outraged, Hargosh slew the man and cursed the woman, calling upon the divine spirit of his great grandfather to visit a doom upon her so that she would always remember and rue the day she betrayed his great sacrifice to woo her. This Thaneer did, and he cursed the woman with immortal life as an ugly and twisted thing that fled into the forest.
Hargosh then burned his cabin to the ground and slew himself on the very spot of the obelisk. Indeed, the obelisk proclaims that he is buried beneath it, without wealth or honours of any sort and proclaims curses upon any who seek to violate the resting place.
The tale is actually true. Hargosh is buried here, though his corpse is long mouldered away and even his bones are little more than flecks of white. The woman lives to this day…for she is the hag of this scenario.
Growing around the obelisk, recently moved into the area, are assassin vines, amidst the ivy and creepers that crawl over the obelisk. Anyone coming close enough to examine the obelisk and read the story of Hargosh will be attacked by the vines.
As the vines have just moved into the area, there is not a lot of evidence of their feeding here. However, a Spot check of DC 25 within 50 ft of the obelisk might allow the observer to notice the bones of dead animals (most small) amongst the grass and leaves of the ground.
The vines themselves are noticeable with a Spot check (DC 20) or with a Survival or Knowledge (nature) check at the same DC.
|
* Assassin Vines (2): CR 3; Large plant; HD 4D8+12; hp 30; Init +0; Spd 5 ft; Space 10 ft; Reach 10 ft (20 ft with vine); AC 15 (touch 9, flat-footed 15); Atk +7 melee (1D6+7, slam); SA constrict 1D6+7, entangle, improved grab; SQ blindsight 30 ft, camouflage, immunity to electricity, low-light vision, plant traits, resistance to cold 10 and fire 10; AL N; SV Fort +7, Ref +1, Will +2; Str 20, Dex 10, Con 16, Int -, Wis 13, Cha 9. Length 20 ft. Skills and Feats: none. Special Attacks: Constrict (Ex): An assassin vine deals 1d6+7 points of damage with a successful grapple check. Entangle (Su): An assassin vine can animate plants within 30 feet of itself as a free action (Ref DC 13 partial). The effect lasts until the vine dies or decides to end it (also a free action). The ability is otherwise similar to Entangle (caster level 4th). Improved Grab (Ex): To use this ability, an assassin vine must hit with its slam attack. It can then attempt to start a grapple as a free action without provoking an attack of opportunity. If it wins the grapple check, it establishes a hold and can constrict. Special Qualities: Blindsight (Ex): Assassin vines have no visual organs but can ascertain all foes within 30 feet using sound, scent, and vibration. Camouflage (Ex): Since an assassin vine looks like a normal plant when at rest, it takes a DC 20 Spot check to notice it before it attacks. Anyone with ranks in Survival or Knowledge (nature) can use one of those skills instead of Spot to notice the plant. Dwarves can use stonecunning to notice the subterranean version. |
On the reverse side of the obelisk, near its base, small carvings in Common have been made. These read as follows:
Follow the flow and the red will flow. Follow the spine for a five mile line.
If the ground before the Common carvings is searched, brushing away the undergrowth and some dirt will reveal the partially buried spine of a dire boar. The spine is placed so that its front points to the south, directly at the location of the bandit lair, which is indeed five miles distant.
The Hag:
The map directs the reader to turn somewhat south from Haldon's Wash at the obelisk, following now a smaller stream that is a tributary of the Wash.
Ten miles along this spring the party will come to a pool set within a clearing. Behind the pool is a cliff and about 50 ft above the pool in the cliff face is a cave opening approximately 15 ft in diameter. Water falls out of the opening into the pool, which then drains to form the stream.
The cliff face continues for another 30 ft above the opening.
There seems to be a way to scramble up the cliff from the edge of the pool by way of fallen rocks and ledges in the cliff face. The way looks to be not too difficult, but will require a modest Climb check (DC 5). Ropes or other means can lower this significantly.
The pool is approximately 50 ft wide by 35 ft long and, for anyone testing it, is 30 ft deep. Its water is potable and some small fish and amphibians dwell within it.
A successful Tracking check (DC 15) will note large footprints (ogre-sized) and signs of at least one large creature inhabiting the area.
The hag has two ogres lairing with her, but one of them is often out hunting or causing trouble, so unless the party chooses to observe the lair for well over a day or two, they will see nothing enter or leave the cave and one of the ogres will be present. If the party waits, eventually the second ogre will return with food, spend a few days within, and then the first ogre will leave to conduct his business. Thus, if ill timed, the party could actually have to face both ogres.
The hag also has three kobold slaves lairing with her. The slaves are fairly useless as combatants, but are good sneaks and provide a watch on the entrance to the lair. One of these little creatures is always hiding amongst a cluster of rocks at the edge of the cave opening, with a good view of the pool and clearing surrounding it.
|
* Green Hag Yavrossa: CR 5; Medium monstrous humanoid; HD 9D8+9; hp 52; Init +1; Spd 30 ft, swim 30 ft; Space 5 ft; Reach 5ft; AC 22 (touch 11, flat-footed 21); Atk +13 melee (1D4+4 [x2], claws); SA spell-like abilities, weakness, mimicry; SQ darkvision 90 ft., spell resistance 18; AL CE; SV Fort +6, Ref +7, Will +7; Str 19, Dex 12, Con 12, Int 13, Wis 13, Cha 14. Height 5 ft 6 in. Skills and Feats: Concentration +7, Knowledge (nature) +7, Hide +9, Listen +11, Spot +11 Swim +12 *; Alertness, Blind-Fight, Combat Casting, Great Fortitude. Special Attacks: Spell-Like Abilities: at will - dancing lights, disguise self, ghost sound (DC 12), invisibility, pass without trace, tongues, water breathing. Caster level 9th. Weakness (Su): A green hag can weaken a foe by making a special touch attack. The opponent must succeed on a DC 16 Fortitude save or take 2d4 points of Strength damage. Mimicry (Ex): A green hag can imitate the sounds of almost any animal found near its lair. Possessions: amulet of blessing. * Can always choose to take 10 on a Swim check, even if distracted or endangered. It can use the run action while swimming, provided it swims in a straight line. |
|
* Amulet of Blessing: This amulet was made by the Thaneeri and is usually given to beloved family members to protect them. The amulet may be called upon by its wearer to invoke the effects of a Bless spell 1/day as if cast by a 10th level cleric. Faint enchantment; CL 3; Craft Wondrous Item, bless; 1600 gp + 64 XP. |
Yavrossa's story is detailed by the runes on the obelisk. After being cursed, she fled into the forest and has haunted it for centuries, turning bitter to all human kind and all good in general as she views her fate as undeserved and has twisted her sins so that she blames Hargosh for driving her into the arms of another man.
Yavrossa has a particular hatred for Thaneeri, and she will attack them in preference of others, calling them "spawn of Hargosh" in Thaneeri as she attacks.
Although Yavrossa was cursed, a Remove Curse spell will not cure her affliction, for she has, over the years, adopted her new form body and soul and it is now her. Only a Wish or Miracle spell could possibly return her to her form, and in doing so she would become mortal and immediately turn to dust as the years caught up with her, though she would likely whisper a quiet "thank you" to the PCs as she blew away.
Yavrossa has survived the centuries by her cunning, and she will use it here. She can become invisible at will, and can disguise herself at will, meaning she can possibly separate party members and then appear as one of them, though the Disguise Self spell does offer a chance to recognize her on close scrutiny and she has no ranks in the Disguise skill.
If things become bleak for her, she will use her Water Breathing ability and her swimming prowess to dive into her cave pool or even leap from the cave opening into the outside pool and escape in that fashion. While she enjoys her lair and her servants, she is far more interested in living her wretched life and extended her bitter existence.
Yavrossa is served by two ogres, brothers names Tharog and Gharog. One will be present at all times. The ogres serve her because she provides them with a good lair and is smart enough to keep them in food and out of trouble. They are also somewhat intimidated by her, for she has proved her mettle to them at times.
|
* Yavrossa's Ogres (2): CR 3; Large giant; HD 4D8+11; hp 31; Init -1; Spd 30 ft; Space 10 ft; Reach 10 ft; AC 16 (touch 8, flat-footed 16); Atk +7 melee (2D8+7, large greatclub) or +2 ranged (1D8+5, large javelin); SQ darkvision 60 ft, low-light vision; AL CE; SV Fort +6, Ref +0, Will +1; Str 21, Dex 8, Con 15, Int 6, Wis 10, Cha 7. Height 9 ft 10 in. Skills and Feats: Climb +5, Listen +2, Spot +2; Toughness, Weapon Focus (javelin). Possessions: large greatclub, large javelins (4); hide armour, leather sack, 140 cp, 35 sp, 26 gp. |
Yavrossa also is served by three kobolds. These were captured by one of the ogres. She finds them useful for fine tasks and for scouting. There were originally eight kobolds, but the rest have gone missing or been killed and eaten by one of the ogres. These kobolds will fight against intruders, out of fear of their mistress and the ogres.
|
* Yavrossa's Kobolds (3): CR ¼; Small humanoid (reptilian); HD 1D8; hp 4; Init +1; Spd 30 ft; Space 5 ft; Reach 5 ft; AC 15 (touch 12, flat-footed 14); Atk +1 melee (1D6-1, small spear) or +3 ranged (1D3, small sling); SQ darkvision 60 ft, light sensitivity; AL LE; SV Fort +2, Ref +1, Will -1; Str 9, Dex 13, Con 10, Int 10, Wis 9, Cha 8. Height 2 ft 4 in. Skills and Feats: Craft (trapmaking) +2, Hide +6, Listen +2, Move Silently +2, Profession (miner) +2, Search +2, Spot +2; Alertness. Possessions: small spear, small sling, sling bullets (20), small knife, leather armour. |
Refer to the Hag Lair map for reference.

The lair appears to be limestone caverns carves from water erosion, the remnants of which form a small stream that runs through the caves. The walls are hard granite, and completely unworked. Unless stated otherwise, ceilings range from 15- 20 ft high and are relatively smooth and devoid of mineral structures.
As all of the inhabitants possess darkvision, none of the area is lit.
1. Entry Way:
This 15 ft wide opening is also 15 feet tall. A 5 ft wide stream issues from within and plummets down to the pool below. The air is damp and near the southern edge the footing can be slippery (Balance check at DC 12 if running within 5 ft of the edge or slip and fall, perhaps plummeting over the side).
Moss grows on the walls and ceiling within 15 ft of the southern edge, and depending upon the weather and time of day, sunlight can pierce as far as 25 feet into the entry way, though shadowy enough to negate the kobolds' sensitivity to light.
On the east side of the stream is a cluster of boulders and small rocks. At all times, one of the three kobolds of the lair is hidden here watching the clearing for signs of trouble. This kobold has exceptional cover when simply observing (treat equivalent to an arrow slit, which degrades to normal cover if shooting his sling.
At the first sign of intruders in the clearing, the kobold will run to tell the ogre in area 4 and then the hag in area 7. The other kobolds will be alerted in round 2 as the kobold goes running past area 2 babbling about intruders in the clearing. It will take 3 rounds to alert the ogre, another 2 rounds to alert the hag, and then 5 rounds to return to the boulders.
The stream in the centre of the way emerges from solid stone to the north, with only several inches of clearance between the top of the hole from which it emerges and the stream. The stream's channel is 5 ft deep and the whole runs fairly fast to the fall into the pool at the south edge of the entryway.
2. Kobold Den:
This small cavern is the lair of the three remaining kobold slaves. There are three ratty fur pallets, made from the pelts of forest creatures sewn with sinew, and small bones and crude stone tools are scattered about.
Two of the three kobolds will generally be here, sleeping or eating or resting.
Hidden in one of the fur pallets is a small bloodstone that one of the kobolds managed to hide from the ogres after ambushing a ranger who had wandered into the area. The bloodstone is hidden at a DC of 15 and is worth 75 gp.
3. Common Area:
This large cavernous area is over 35 feet tall at its centre, the ceiling vaulting up from a height of 20 feet at the edges. Four natural stone columns support the weight of the roof, and mounted upon these are the heads and skulls of past victims of the hag and her ogre minions. Included are orc and goblin heads, a few human males and females, and a kobold or two.
In the area between the four pillars is a small pit, 5 feet deep and 10 feet round which holds offal and bones and other discards. Flies buzz around the noisome pit and maggots spawn within.
To the south, a passage is clearly blocked off with a wooden panel held in place by some largish boulders and stones. It would take six Strength checks (DC 15) to clear away the boulders enough to remove the wooden mantle (with every 5 over 15 counting as an extra check). Beyond, a twisty passageway 5 feet in diameter snakes off to the south to area 8. The hag, kobolds, and ogres know of the carrions crawlers in area 8 and use the mantle to keep them from intruding into their lair.
4. Ogre Den:
This cave is the den of the two ogres, Tharog and Gharog. One
will be present at all times, the other usually out for hunting
or sport, but sometimes both will be here.
The place is smelly and filthy, strewn with bones and bits of fur and flesh that didn't even make it to the refuse pit in area 3.
Two large fur pallets rest here, along with a large boulder, relatively flat on the top, used as a table and two smaller boulders used as stools.
Upon the table are crude wooden mugs and a large bladder filled with sweet, thick wine. A half-eaten deer carcass lies across the table as well.
Each ogre, when present, keeps his loot bag under his pallet. When out of the lair, an ogre takes his loot bag with him, not trusting his brother to keep his hands off of it. Each loot bag is made of fur and uncured hides and holds 2D100 cp, 3D100 sp, 1D100 gp, and 1D20 pp. In addition, each holds 1D6 gems worth 10-100 gp each.
5. Prison:
Currently empty, a large round boulder, some 5 feet in diameter, lies next to the entrance to this place. The entrance itself is 5 feet in diameter, allowing a strong brute to plug the way with the boulder, effectively sealing it from the outside. The boulder weighs a good 1500 lbs, which allows a single ogre to drag it to and from the opening.
Within is a dark, damp place. The ceiling remains 5 feet tall until the very end, where it squeezes down into a crack that finally ends inches tall.
Bones of past prisoners can be found here, along with chalk-like marks made with small stones, some of which are tally marks marking out time. Others are in the shape of holy symbols to various deities, and a few are bits of graffiti that contain pleas for deliverance or a swift death to various gods, names of past victims, etc.
One scrawl reads:
"We should have paid due to the writing on the base of the obelisk. Esistern was right in this. Alas, it is too late for us!"
6. Larder:
This area serves as the larder for the lair. Laid out on stones are several fish, some partially gutted, toads, and frogs. Several birds hang by the talons from cords tied to spikes pounded into the walls, their juices dripping into skulls stopped with wax and being used as macabre bowls.
Several venison and wild goats are also lying here, some of it starting to rot and stink. Flies buzz around the area here.
Also here is a mouldy wheel of unidentifiable cheese, several barrels of vinegarish wine, and a half dozen ruined bolts of cloth.
7. Hag's Den:
The stream flows noisily out of this cavern, flowing down the descending passageway before plunging into the rock wall to the south and eventually emerging from it to enter area 1. The channel here is 5 feet deep and where it enters the rock there are only a few inches of clear space above the stream.
To the north, the cavern proper is some 30 feet tall, and the stream emerges from a small pool set against the north wall that is, itself, fed by a waterfall that emerges from a 3 foot diameter hole 15 feet up on the north wall. The pool is some 12 feet deep and its sides drop precipitously to that depth. In addition, the walls of the pool extend about 4 feet above the surface of the water, making it difficult to clamber out of the pool without first swimming to where the pool outlets into the channel that heads south out of the cavern.
In the eastern portion of the cavern sits a flat-topped stone being used as a table and smaller stones as chairs. Upon the table is set the flayed body of a human male, mutilated beyond recognition. Set on the table next to the corpse is a sharp stone flaying knife.
In the west of the area is a 3 foot stone shelf that holds a pallet of furs…the bed of the hag. Hanging around this shelf are various grisly trophies gathered by the hag over her millennia of existence, including skulls, bones, and the dried organs of various beings. These are accentuated by lumps of amber and quartz, polished stones, and various semi-precious stones, a few of which are set in copper or silver jewelry (total of 275 gp).
Scratched into the cave wall above the pallet are Thaneeri words:
"Forgiveness is the home of fools, vengeance the palace of the damned."
Hidden behind a loose stone near the shelf is a small niche (Search DC 25) that holds the hag's treasure. This includes:
|
* Bracers of Swift Striking: These bracers are carved from the bones of a dire wolverine and covered in the skin of a viper. The inner surface in covered in Thaneeri runes of speed and mastery. Anyone wearing these bracers will gain a +1 to initiative rolls. Both bracers must be worn to gain this advantage. If the wearer is a Thaneeri, the bonus increases to +2 provided he has observed proper Thaneeri mores and has not ridden a horse or other beast of burden within the last 13 months. These bracers are cursed to slow down any non-humans who wear them, imparting a -1 penalty to initiative instead of the bonus. Moderate transmutation; CL 5; Craft Wondrous Item; bestow curse, prayer; 1400 gp + 56 XP. |
8. Den of the Crawlers:
The blocked passageway from area 3 leads down a twisty tunnel 5 feet in diameter that opens into a diamond-shaped chamber with a 15 foot high ceiling. The chamber is studded with stalagmites and stalactites, and these conceal in shadows the other passageway that exits from the east wall of the cave. That passageway is also 5 feet in diameter.
This cave is sprinkled with bones of various creatures that appear to have been chewed or gnawed upon.
The place is the lair of two carrion crawlers that used to haunt this entire cavern complex before the hag and her ogres cleared them out and forced them into this single cave, behind the barrier in area 3. The hag now considers these crawlers to be harmless to her, and she often tosses them a meal for her own amusement.
The crawlers can use the eastern passageway to escape from their cave, though they seldom do, for the hag keeps them fed enough for them to remain. The passageway leads up and into the hillside for a good 150 feet before emerging into a cave on the other side of the hill. Occasionally an animal or creature will take shelter in this cave and the crawlers will feed upon the hapless victim(s).
Should an ogre in area 3 or any one else begin to remove the panel separating area 3 from this area, at least one carrion crawler will shamble over the investigate, and be waiting just behind the panel…likely quite a surprise when the panel is removed!
Otherwise, these crawlers will attack anyone entering their lair.
|
* Carrion Crawlers (2): CR 4; Large aberration; HD 3D+6; hp 19; Init +2; Spd 30 ft, climb 15 ft; Space 10 ft; Reach 5 ft; AC 17 (touch 11, flat-footed 15); Atk +3 melee (paralysis [x8], tentacles) and -2 melee (1D4+1, bite); SA paralysis; SQ darkvision 60 ft, scent; AL N; SV Fort +3, Ref +3, Will +5; Str 14, Dex 15, Con 14, Int 1, Wis 15, Cha 6. Length 10 ft. Skills and Feats: Climb +12, Listen +6, Spot +6; Alertness, Combat Reflexes, Track. Special Attacks: Paralysis (Ex): Those hit by a tentacle attack must succeed on a DC 13 Fort save or be paralyzed for 2D4 rounds. |
Part Three - The Bandits:
The bandits who form the Green Arrows are no fools. However, Aramith was the clear leader and initiator of the group. As such, the bandits are temporarily paralyzed while they wait to resolve the fate of their leader.
Clearer heads might have, by the time the PCs arrive, figured out that the rescue attempt on Aramith had failed or, even had it succeeded, that the bandit leader was not going to return to this lair.
However, the bandits have elected
to remain in their forest shelter, thinking it secure for the
time being. They do not believe their illustrious leader Aramith
would divulge the location of the lair, even under torture (Aramith
himself helped to stoke his larger than life image amongst the
bandits to increase the effectiveness of his leadership) and they
erroneously expect him to return if freed to resume his leadership
of the group.
In addition, at least one of the remaining bandit leaders harbours
ambitions to carry on as the new leader of the Green Arrows should
Aramith not turn up. As such, he does not wish the Arrows to be
scattered to the winds, but hopes that the capture and execution
of Aramith will clear the way for him to ascend to successful
command of the Green Arrows.
Therefore, the bandits have remained, either awaiting the return of their leader, Aramith, or trying to rally under the leadership of their new masters. Left to their own devices, it is uncertain whether a new leader could hold them together. It is more likely that after a few months and a few attempts at banditry the Arrows would split up and dissolve.
The leaders do not know about Broscus' Map, as that was given to the traitorous lieutenant by one Raddolf of the Dwillingir Thieves' Guild. Raddolf waits in Dwillingir to hear whether the lieutenant has been successful and the bandit leader rescued before heading to the bandit lair to pay Broscus his blood price. He also is not overly concerned about anyone finding Broscus' Map because it ultimately leads to the Hag's Lair. Unfortunately for the bandits and, ultimately, for Raddolf, the hag got hold of a real map to the Bandits' Lair when her ogres waylaid a lone Green Arrow contact and it is likely that the PCs will have come to the lair by way of that map.
As such, the bandits of this lair will not be expecting an imminent attack. However, they are naturally alert and their standard wariness remains intact. Aramith did not suffer laziness or fools in the Green Arrows, and his men are not to be taken lightly.
The Bandits' Lair is described in detail below. These bandits are a cohesive group, though less so without Aramith present, but they are not fanatics, and if the tide turns against them, they will flee or even surrender in extremis. These men are bandits for wealth or the thrill of it all…not things for which they will easily throw away their lives.
The Lair descriptions presume that none of the bandits from "Witness Protection" made it back home. If somehow this is not the case, then the DM should adjust accordingly.
The Bandits' Lair:
The Bandits' Lair is located 5 miles south of the obelisk. It is located in the face of a small hill, one of many in the region. There is little to distinguish the area surrounding the lair from any other area of the forest.
Ground Approach:
Refer to the Bandit Lair - Ground Approach Map for details.

Each contour line represents 25 feet of elevation.
Track checks can turn up traces of the bandits in the area.
1. West Tree Sentinel:
This tree, like its companion in area 2, is used as a watch tower by the bandits to watch for intruders. While both trees are positioned ostensibly to ward the approach from the north, the sentinels can also observe the top of the hill and note intruders approaching from that direction as well.
These trees have nothing immediately apparent to distinguish them from the many trees in the area. However, their trunks are hollow well up towards the top, being some 8 feet in diameter at the base and 5 feet in diameter at the top. Wooden pegs provide a makeshift ladder to climb up and down inside the trunk. In addition, a greased rope hangs down the centre of the hollow trunk, allowing a sentinel to slide down quickly from top to bottom in a single round.
Sitting on branches concealed by leaves is a Green Arrow bandit. They are fairly alert, and will never be sleeping, especially as they are eager to espy Aramith returning to the lair.
If these sentinels espy intruders, they are under instruction to take no offensive actions, but instead to descend their trunks via the greased ropes to the bottom, where a concealed wooden frame covered in rocks and leaves can be moved aside revealing a 5 foot diameter hole heading down.
This hole descends another 10 feet via a wooden ladder before turning into a horizontal tunnel running south. This tunnel eventually connects north of the side entrance cave (area 5) as shown on the Ground Level Map. In this way, the sentinel can quickly warn the lair of intruders.
It takes a single round to slide down the rope, another to open the trapdoor, and another to climb down the wooden ladder. Thereafter, it takes six rounds to scramble uphill through the tunnel before emerging into the Ground Level Map.
The sentinel will be hidden in the tree, using his Hide skill.
|
* Bandit Archer: Male human Rogue 1/Ranger 1; CR 2; Medium humanoid (human); HD 1D6+1 plus 1D8+1; hp 13; Init +2; Spd 30 ft; Space 5 ft; Reach 5 ft; AC 15 (touch 12, flat-footed 13); Atk +2 melee (1D8+1, longsword) or +4 melee (1D8, longbow); SA sneak attack +1D6, favoured enemy (humans +2); SQ trapsense, wild empathy; AL NE; SV Fort +3, Ref +6, Will +0; Str 12, Dex 15, Con 13, Int 13, Wis 10, Cha 11. Height 5 ft 8 in. Skills and Feats: Balance +7, Bluff +5, Climb +6, Craft (fletching) +4, Heal +3, Jump +6, Knowledge (nature) +2, Listen +3, Sense Motive +3, Spot +4, Survival +4, Swim +3, Tumble +7; Precise Shot, Track, Weapon Focus (longbow). Possessions: longbow, arrows (20), longsword, studded leather armour, traveller's outfit, belt pouch, 25 sp, 13 gp. |
2. East Tree Sentinel:
Similar to area 1, the tunnel here takes 8 rounds to negotiate due to the increased length. It emerges into the Ground Level Map near area 4 (the Main Entrance cave).
|
* Bandit Archer: Male human Rogue 1/Ranger 1; CR 2; Medium humanoid (human); HD 1D6+1 plus 1D8+1; hp 13; Init +2; Spd 30 ft; Space 5 ft; Reach 5 ft; AC 15 (touch 12, flat-footed 13); Atk +2 melee (1D8+1, longsword) or +4 melee (1D8, longbow); SA sneak attack +1D6, favoured enemy (humans +2); SQ trapsense, wild empathy; AL NE; SV Fort +3, Ref +6, Will +0; Str 12, Dex 15, Con 13, Int 13, Wis 10, Cha 11. Height 5 ft 8 in. Skills and Feats: Balance +7, Bluff +5, Climb +6, Craft (fletching) +4, Heal +3, Jump +6, Knowledge (nature) +2, Listen +3, Sense Motive +3, Spot +4, Survival +4, Swim +3, Tumble +7; Precise Shot, Track, Weapon Focus (longbow). Possessions: longbow, arrows (20), longsword, studded leather armour, traveller's outfit, belt pouch, 25 sp, 13 gp. |
3. Forest Pool:
This pool is clear, though unused by the bandits due to the presence of plenty of fresh water in the lair itself. A 5-6 foot wide stream chugs out of the Main Entrance and flows north into this pool, which then overspills its lip at two points on its slightly downward sloped northern end, forming two rivulets that travel northwest and northeast respectively.
The stream flowing out of the Main Entrance is shallow, approximately 3-4 feet deep and fairly fast flowing. The stones are slippery, possibly causing a Balance check if run across.
The two rivulets are only a couple of feet deep and about 3-4 feet wide and are less fast flowing.
The pool itself is over 10 feet deep at its centre and the bottom is choked with weeds and stones. A few small fish and amphibians swim within.
4. Main Entrance:
This cave opening is split by a stream burbling forth from its midst. The opening is roughly semi-circular and some 12 feet wide by 8-10 feet tall.
5. Side Entrance:
This entrance is some 25 feet above the level of the Main Entrance. It is only 10 feet wide and 7 feet tall and is screened from casual observation by several nearby trees and strategically placed bushes and stones. This entrance is not intended as a practical entrance by the bandits, but rather as an escape route or flanking point. The entrance requires a base Spot check of DC 15 from any distance over 20 feet, with further modification for distances beyond that.
Ground Level:
This level serves as the initial defenses of the lair as well as its upper barracks. The level is sparsely populated, as most of the bandits dwell in the Lower Level.
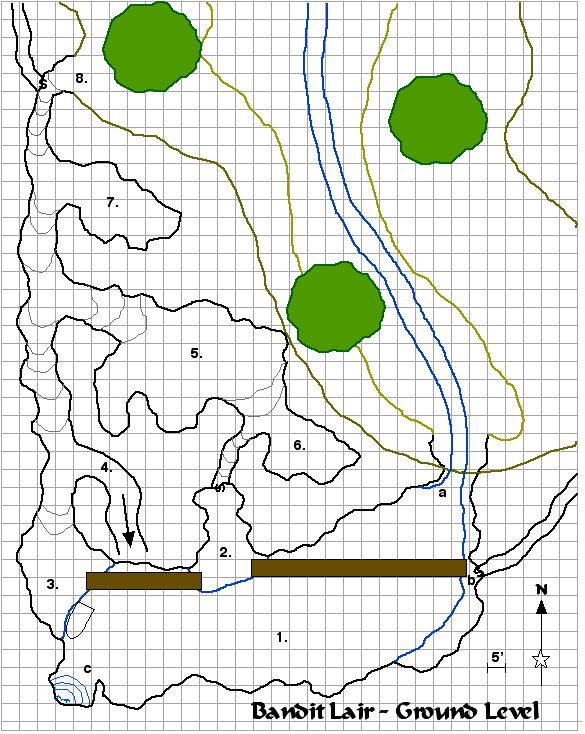
Passageways are generally 8-10 feet tall unless otherwise stated and there are oil lamps hanging from chains or sconces to provide illumination.
1. Cavern of the Lake:
This large cavern is over 110 feet wide and over 40 feet long and quickly vaults to over 40 feet high as it follows the contour of the hill upward.
The cavern is dominated by a large lake that fills most of the place. The water is dark and placid, except at points 'a' and 'c', and is potable.
Point 'a' is the Main Entrance of the lair (refer to Ground Approach area 4), and is comprised of two stone ledges that flank the stream emerging from the cavern. The western ledge quickly peters out, merging with the north wall of the cavern, while the eastern ledge continues in a slight crescent, forming a ledge that varies from 3-7 feet wide that arcs all the way around to the southern wall.
Both ledges are between 1-2 feet above the level of the water.
The lake itself is fairly deep, with its edges dropping steeply away to its full depth of over 30 feet. The stream at point 'a' merely represents the overflow runoff from the lake. Additional runoff points occur through cracks at the bottom of the lake that drain into subterranean paths.
At point 'b', the passageway from the East Tree Sentinel (Ground Approach, area 2) meets the ledge, though it is concealed by a wooden frame stuck with stones so that it appears a part of the cavern wall from this side. While this secret door will not hold up to tapping or other such methods, it can fool casual observation (Search DC 10 or Spot DC 20 [the latter only if gazing directly at the area]).
In addition, a wooden plank and rope bridge begins at this point and spans the lake to area 2. The bridge contains rope side rails and sways and creeks as people move upon it. The bridge cannot support a total weight in excess of 600 pounds. Each rope has 4 hit points.
The bridge is formed from four ropes tied to the western ledge, accessed by climbing several wooden steps. The bridge is supported by ropes that ascend from various points on each side of the bridge to iron eyelets pounded into the ceiling. More wooden steps lead down to area 2 at the bridge's western end. The bridge itself is some 6-7 feet above the level of the lake.
Point 'c' is where water enters the cavern, pouring out of several cracks 20 feet above the water and falling in sheets noisily into the cavern lake.
2. Den of the Beast:
This area forms a stone shelf that outthrusts into the lake at area 1. The shelf is some 3-4 feet above the water level and draws back into the shadows of the northern walls of the Cavern of the Lake, its deepest portion out of sight of even the southernmost terminus of the western ledge in area 1.
The bridge from 1b ends here, and another bridge of similar construction begins at this area's southwestern edge and crosses a short span to area 3.
A secret door, constructed of a wooden frame whose southern side is fitted with rocks and dirt to look like the cavern wall (Search DC 10 or Spot DC 20 [if gazing at the specific area]), inhabits the northern corner of the area, and before it is a small nest made up of a pile of furs as well as piles of gnawed upon bones and a freshly killed and partially eaten deer carcass.
Within this area dwells a displacer beast, a servant of the bandits. The displacer beast was befriended by the bandits as a cub, driven from the mountains by rivals, and its evil nature dimly comprehends the activities of the bandits and appreciates their cruelty as well as the opportunity to hunt and feed.
The beast is loyal to the bandits and will fight fiercely in their stead, recognizing intruders on sight unless they are well disguised. The beast will respond to basic commands if issued from a known bandit, and it obeys well, as it is about twice as intelligent as a normal dog.
The beast drinks from the lake, using its tentacles to scoop up water to drink, and although it has free run of the place and can access areas 1 and 3 via the bridges (though with much swaying and creaking) it usually waits until the bandits take it out on hunting expeditions where it can track, catch, and play and torture the game it captures before bringing it back to eat it.
|
* Displacer Beast: CR 4; Large magical beast; HD 6D10+18; hp 54; Init +2; Spd 40 ft; Space 10 ft; Reach 5 ft (10 ft with tentacles); AC 16 (touch 11, flat-footed 14); Atk +9 melee (1D6+4 [x2], tentacles) and +4 melee (1D8+2, bite); SQ darkvision 60 ft, displacement, low-light vision, resistance to ranged attacks; AL LE; SV Fort +8, Ref +7, Will +3; Str 18, Dex 15, Con 16, Int 5, Wis 12, Cha 8. Length 9 ft. Skills and Feats: Hide +10, Listen +5, Move Silently +7, Spot +5; Alertness, Dodge, Stealthy. Special Qualities: Displacement (Su): A light-bending glamer continually surrounds a displacer beast, making it difficult to surmise the creature's true location. Any melee or ranged attack directed at it has a 50% miss chance unless the attacker can locate the beast by some means other than sight. A True Seeing effect allows the user to see the beast's position, but See Invisibility has no effect. Resistance to Ranged Attacks (Su): A displacer beast has a +2 resistance bonus on saves against any ranged magical attack that specifically targets it (except for ranged touch attacks). |
3. Stone Dock:
This stone ledge is some 4 feet above the water level. The western terminus of the wooden bridge from area 2 arrives here, descending via wooden steps to the floor of the shelf.
Tied to a metal eyelet pounded into the floor is an 8 foot long rowboat, with two oars and two barrels set within. The boat is used to gather fresh water from the falls at area 1c and can also be used to cross the lake.
Half a dozen barrels of water cluster in the southern corner of the shelf, near the water.
The hall to the north is lit by oil lamps, and the glow of the light diffuses into this area.
4. Stone Ramp:
This stone ramp curves around and down to the south steeply, at a 30 degree angle, punctuated by occasional wide stone steps that help to relieve the descent. The hall bends just under the bottom of the Cavern of the lake, its 10 foot tall top a mere 3 feet below the bottom of the lake. The ramp is lit by oil lamps and eventually emerges into the Lower Level.
5. Upper Barracks:
This cavern is list by oil lamps and serves as a living quarters for some of the bandits. The cavern is 15 feet high and the floor is roughly even, though it slopes down to the southeast slightly.
Some of the bandits who took part in the scenario "Witness Protection" were stationed here, specifically, half of the bandit footmen and half of the archers. With them gone, a few of the remaining bandits have taken up residence here so as to help man this level of the lair.
There are living arrangements here for some twenty six bandits, including twenty six fur pallets (all but twelve of which are folded up and shoved against the walls) and a similar number of wooden boxes and chests that are all locked (DC 15, keys on the individual bandits, including those from "Witness Protection") and filled with personal effects of various sorts. A few weapon racks dot the room, and several wooden tables and chairs sit in the center of the chamber. Half a dozen cheap braziers are placed at intervals around the room to help keep it warm.
Currently, ten bandits are here, under the command of their leader in area 6. These are not expecting any trouble, and usually dwell on the Lower Level, but are living here temporarily until their comrades return from their raid on the prisoner caravan. At night, six of their number will be asleep at any one time, the other four on a rotating watch seated at the tables. Occasionally, a bandit will head to area 7 for some food or drink or even outside to relieve himself. The two bandits in the Sentinel Trees (areas 1 and 2 of the Ground Approach) are relieved by archers in this chamber.
To the southwest, stone steps lead to a thick red curtain that blocks off area 6.
Where the chamber meets the contour line behind a tree is a long thin stone plug. This can be pulled out revealing an arrow slit that looks out of the hillside. This slit is warded by a makeshift wooden screen so that light from inside the area does not leak out at night. This slit is used to observe the approaches to the lair, though it is not normally manned unless trouble is expected or an alert sounded.
Arrows can be fired out of the slit, which is well screened by the tree in front of it. Any shots passing near the center of the tree will provide its target with cover.
|
* Bandit Footmen (6): Male human Ranger 1/Fighter 1; CR 2; Medium humanoid (human); HD 1D8+2 plus 1D10+2; hp 16; Init +1, Spd 30 ft; Space 5 ft; Reach 5 ft; AC 16 (touch 11, flat-footed 15); Atk +5 melee (1D8+2, longsword) or +3 ranged (1D6+2, throwing axe); SA favoured enemy (magical beasts +2); SQ wild empathy; AL CN; SV Fort +6. Ref +3, Will +1; Str 15, Dex 13, Con 14, Int 11, Wis 12, Cha 12. Height 5 ft 11 in. Skills and Feats: Climb +5, Hide +6, Jump +5, Knowledge (nature) +3, Listen +7, Move Silently +3, Spot +7, Survival +5, Swim +5; Alertness, Dodge, Mobility, Track, Weapon Focus (longsword). Possessions: studded leather armour, heavy wooden shield, traveller's outfit, throwing axes (3), longsword, belt pouch, whetstone, 13 cp, 14 sp, 9 gp. |
|
* Bandit Archers (4): Male human Rogue 1/Ranger 1; CR 2; Medium humanoid (human); HD 1D6+1 plus 1D8+1; hp 13; Init +2; Spd 30 ft; Space 5 ft; Reach 5 ft; AC 15 (touch 12, flat-footed 13); Atk +2 melee (1D8+1, longsword) or +4 ranged (1D8, longbow); SA sneak attack +1D6, favoured enemy (humans +2); SQ trapsense, wild empathy; AL NE; SV Fort +3, Ref +6, Will +0; Str 12, Dex 15, Con 13, Int 13, Wis 10, Cha 11. Height 5 ft 8 in. Skills and Feats: Balance +7, Bluff +5, Climb +6, Craft (fletching) +4, Heal +3, Jump +6, Knowledge (nature) +2, Listen +3, Sense Motive +3, Spot +4, Survival +4, Swim +3, Tumble +7; Precise Shot, Track, Weapon Focus (longbow). Possessions: longbow, arrows (20), longsword, studded leather armour, traveller's outfit, belt pouch, 25 sp, 13 gp. |
6. Leader's Quarters:
This 10 foot high cave was originally the dwelling of Hastirfolg, one of the bandit leaders from "Witness Protection" (the one with the dire flail). It is now being used temporarily by the new master of this level.
The place is separated from area 5 by a thick red curtain.
The room does not reflect its current master's tastes, instead it is adorned with a plush purple carpet and velvet tapestries and drapes covering the walls. A fine pile of furs next to a brass brazier serves as a bed, and a wooden table and chairs are set in the center of the room.
Two chests are here. Both are made of wood reinforced with iron bands sits near the furs. They are locked (DC 20, keys on the respective owners), and one belongs to the current resident of this area, and the other belongs to the previous resident who took part in "Witness Protection".
The chest from the previous owner holds clothing, valueless personal effects, a large pouch holding 150 cp, 130 sp, 140 gp, and a dozen small gems worth 1D20 gp each.
The chest of the current owner holds clothing, a set of masterwork tools suitable for the Craft (trapmaking) skill, a wooden holy symbol to Hastaforr, a book entitled "The Romance of Khenni" which tells the tale of the famous Hero Khenni's ill-fated romance with a wereraven, a silver dagger with a pommel in the shape of a fountain of water (45 gp), a rolled up parchment which is a bearer's credit for 160 gp redeemable at the Indolle Temple in Noscrused, and a small wooden box holding 100 gp, 23 pp, and a small diamond worth 125 gp.
Currently lairing in this chamber is Gadinfir, a crusty veteran of the group who is often regarded as the second great mind of the Green Arrows. He is adept at planning and executing raids, and is a very adept tactician as well. The men respect his leadership and will obey his commands as long as things go well.
Gadinfir was a genuine admirer of Aramith and eagerly awaits his master's return, not considering that the self-absorbed Aramith wouldn't bother to return to round up his followers. However, Gadinfir will is not above fleeing if it appears he will be surely slain or captured.
He does not trust Akruba (and rightly so), and was the sometimes lover of Shadress, the female sorceress present in "Witness Protection". He will not be pleased to learn of her death.
|
* Gadinfir: Male human Rogue 2/Fighter 2; CR 4; Medium humanoid (human); HD 2D6+4 plus 2D10+4; hp 30; Init +5, Spd 30 ft; Space 5 ft; Reach 5 ft; AC 17 (touch 13, flat-footed 14); Atk +5 melee (1D8+1, longsword) or +3 melee (1D8+1, longsword) and +2 melee (1D4, dagger) or +6 ranged (1D6, shortbow); SA sneak attack +1D6; SQ evasion, trapfinding; AL CN; SV Fort +5, Ref +6, Will +2; Str 14, Dex 17, Con 15, Int 18, Wis 12, Cha 10. Height 5 ft 9 in. Skills and Feats: Balance +10, Bluff +5, Climb +8, Craft (trapmaking) +7, Decipher Script +6, Diplomacy +6, Disable Device +4, Gather Information +7, Hide +7, Intimidate +4, Jump +10, Knowledge (local) +8, Listen +6, Move Silently +7, Search +5, Sense Motive +5, Spot +7, Swim +8, Tumble +10, Use Magic Device +5; Blooded, Dodge, Two-Weapon Defense, Two-Weapon Fighting, Weapon Focus (longsword). Possessions: longsword, chain shirt, dagger, explorer's outfit, shortbow, arrows (20), silver arrows (12), belt pouch, whetstone, potion belt, potion of Cure Light Wounds at 1st level, scroll of Charm Person at 1st level, potion of Cat's Grace at 3rd level, masterwork, thieves' tools, 65 cp, 32 sp, 14 gp. |
7. Store and Larder:
This 6 foot tall cavelet is used to store goods for the bandits in area 5 and 6. The space is crammed full of barrels of water, ale, beer, and wine and boxes of various foodstuffs, including dried meats, cheeses, and nuts and potatoes. Also here are some mundane items of equipment, including hemp rope, some wooden planks, nails, work hammers, carving knives, oil lamps, iron spikes and eyelets, lamp oil, etc.
At the very rear of the chamber is a small fire pit that shows recent use. The walls are covered in soot, as is the ceiling here, and a small chimney rises through the stone ceiling to emerge at the hillside. The chimney is a 3 inch wide shaft that is kinked as it rises so that water will not fall through during rain and light will not leak out from a fire below. The bandits generally only make a fire at night, so that the smoke will not be seen from any distance. The use the fire to cook and to heat the coals of their braziers.
8. Side Entrance:
This entrance is described in detail in area 5 of the Ground Approach. The bandits do not keep a guard here, preferring to rely on the cave's concealment to screen it from intruders. Nonetheless, Gadinfir has placed a trap here to ward against unwarranted trespassers, including the occasional animal or wild beast.
The trap is a rope net set on the floor and covered in dust. When a tripwire set across the middle of the net is broken, the wooden poles attached to the net are released, and the net snaps up against the ceiling, pinning the victim and rattling several bags of copper coins, raising quite a ruckus as well.
| * Net Trap: CR 2; mechanical; location trigger; manual reset; Atk +10 (see note); alarm component (alerts those nearby); Search DC 20; Disable Device DC 20. Note: Characters in the square are grappled by the net (Str 18) if they fail a DC 25 reflex save. |
Defense of the Ground Level:
Gadinfir will take charge of the forces on this level once alerted to intruders. The ideal bandit plan would be to station two bandit archers on the other side of the secret door at area 1b. As the intruders cross the rope bridge from area 1b to area 2, these will emerge from the secret door and cut the ropes to the bridge (there are four normal hemp ropes securing the bridge, and they will cut both ropes on one side first, causing the bridge to suddenly tip to one side).
Their hope is that some of the intruders will be dumped in the lake, while others are on the shelf at area 2.
Then, other bandits will emerge into area 3 and cut the ropes to the bridge from area 2 to area 3. This will, hopefully, leave the intruders either treading water or drowning in the lake or trapped with the displacer beast in area 2. The bandits presume the intruders will not quickly find the secret door in the north of area 2.
While the displacer beast is fought, the bandit archers will position themselves at area 3 and south of area 1b and shoot any intruders in area 2 or swimming in the lake. Meanwhile, reinforcements from the lower levels will mass in area 5 and, when prepared, open the secret door to area 2 and attack the intruders, who will have to route by which to retreat.
Lower Level:
This level houses most of the living space of the Green Arrows, including most of the hierarchy of the group as well as a portion of the lay members of the bandits. Much of the level is empty now, as the bandits who took part in the attack on the prison caravan in "Witness Protection" have not returned.

All locations are lit by oil lamps in sconces or hanging from chains.
All passages are 8 feet tall unless otherwise stated.
1. Lower Lake Cave:
This large cave is only 15 feet high from floor to ceiling. The center and northwestern portion of the place is dominated by a lake that is fed from drops and trickles emerging from cracks in the ceiling that allow water to drain from the lake above (area 1 - Ground Level). The lake is 60 feet deep and itself drains by means unknown. The lake is currently 3-4 feet below the level of the cavern floor, and the sides of the lake are not sheer, but not gently sloped either, requiring a Climb check (DC 10) to get out.
The water here is fairly pure, as the minerals and rocks between the lake above and this lake serve to somewhat filter the water. Nothing lives in the lake.
Several barrels of water rest to the southeast of the cave, against the wall, and above that a wooden peg has been pounded into a crack in the wall and a wooden tray set several feet below it. The peg is a resting place for Ilpanay's bat familiar, and the tray catches its droppings. Examination of the tray will, in fact, reveal old bat guano.
2. Guard Niche:
This small cave holds two bandit guards who watch the approach to this level and also remain alert for any disturbances from above.
With them are a coal brazier, a small table and chairs, a bottle of wine and some wooden mugs, some furs, a hooded lantern, and a small gong that can be clanged loudly to alert the rest of the level.
|
* Bandit Footman: Male human Ranger 1/Fighter 1; CR 2; Medium humanoid (human); HD 1D8+2 plus 1D10+2; hp 16; Init +1, Spd 30 ft; Space 5 ft; Reach 5 ft; AC 16 (touch 11, flat-footed 15); Atk +5 melee (1D8+2, longsword) or +3 ranged (1D6+2, throwing axe); SA favoured enemy (magical beasts +2); SQ wild empathy; AL CN; SV Fort +6. Ref +3, Will +1; Str 15, Dex 13, Con 14, Int 11, Wis 12, Cha 12. Height 5 ft 11 in. Skills and Feats: Climb +5, Hide +6, Jump +5, Knowledge (nature) +3, Listen +7, Move Silently +3, Spot +7, Survival +5, Swim +5; Alertness, Dodge, Mobility, Track, Weapon Focus (longsword). Possessions: studded leather armour, heavy wooden shield, traveller's outfit, throwing axes (3), longsword, belt pouch, whetstone, 13 cp, 14 sp, 9 gp. |
|
* Bandit Archer: Male human Rogue 1/Ranger 1; CR 2; Medium humanoid (human); HD 1D6+1 plus 1D8+1; hp 13; Init +2; Spd 30 ft; Space 5 ft; Reach 5 ft; AC 15 (touch 12, flat-footed 13); Atk +2 melee (1D8+1, longsword) or +4 ranged (1D8, longbow); SA sneak attack +1D6, favoured enemy (humans +2); SQ trapsense, wild empathy; AL NE; SV Fort +3, Ref +6, Will +0; Str 12, Dex 15, Con 13, Int 13, Wis 10, Cha 11. Height 5 ft 8 in. Skills and Feats: Balance +7, Bluff +5, Climb +6, Craft (fletching) +4, Heal +3, Jump +6, Knowledge (nature) +2, Listen +3, Sense Motive +3, Spot +4, Survival +4, Swim +3, Tumble +7; Precise Shot, Track, Weapon Focus (longbow). Possessions: longbow, arrows (20), longsword, studded leather armour, traveller's outfit, belt pouch, 25 sp, 13 gp. |
3. Lower Barracks:
This large cavern is 20 feet high and supported by several thin stone columns as indicated on the map.
The place serves as the living area for some 34 bandits, most of whom are now either temporarily quartered on the Ground Level or went with off to raid the prison caravan. There are 22 fur pallets here, fourteen of which are rolled up and pushed against the walls awaiting their owners' return. The remaining eight pallets serve the six bandits who are here, plus the two on guard duty in area 2.
There are also 22 wooden boxes and chests that are all locked (DC 15, keys on the individual bandits, including those from "Witness Protection") and filled with personal effects of various sorts. A few weapon racks dot the room, and several wooden tables and chairs sit in the center of the chamber. A dozen cheap braziers are placed at intervals around the room to help keep it warm, and a few of these have grills atop them used for cooking.
|
* Bandit Footmen (3): Male human Ranger 1/Fighter 1; CR 2; Medium humanoid (human); HD 1D8+2 plus 1D10+2; hp 16; Init +1, Spd 30 ft; Space 5 ft; Reach 5 ft; AC 16 (touch 11, flat-footed 15); Atk +5 melee (1D8+2, longsword) or +3 ranged (1D6+2, throwing axe); SA favoured enemy (magical beasts +2); SQ wild empathy; AL CN; SV Fort +6. Ref +3, Will +1; Str 15, Dex 13, Con 14, Int 11, Wis 12, Cha 12. Height 5 ft 11 in. Skills and Feats: Climb +5, Hide +6, Jump +5, Knowledge (nature) +3, Listen +7, Move Silently +3, Spot +7, Survival +5, Swim +5; Alertness, Dodge, Mobility, Track, Weapon Focus (longsword). Possessions: studded leather armour, heavy wooden shield, traveller's outfit, throwing axes (3), longsword, belt pouch, whetstone, 13 cp, 14 sp, 9 gp. |
|
* Bandit Archers (3): Male human Rogue 1/Ranger 1; CR 2; Medium humanoid (human); HD 1D6+1 plus 1D8+1; hp 13; Init +2; Spd 30 ft; Space 5 ft; Reach 5 ft; AC 15 (touch 12, flat-footed 13); Atk +2 melee (1D8+1, longsword) or +4 ranged (1D8, longbow); SA sneak attack +1D6, favoured enemy (humans +2); SQ trapsense, wild empathy; AL NE; SV Fort +3, Ref +6, Will +0; Str 12, Dex 15, Con 13, Int 13, Wis 10, Cha 11. Height 5 ft 8 in. Skills and Feats: Balance +7, Bluff +5, Climb +6, Craft (fletching) +4, Heal +3, Jump +6, Knowledge (nature) +2, Listen +3, Sense Motive +3, Spot +4, Survival +4, Swim +3, Tumble +7; Precise Shot, Track, Weapon Focus (longbow). Possessions: longbow, arrows (20), longsword, studded leather armour, traveller's outfit, belt pouch, 25 sp, 13 gp. |
4. Leader's Quarters:
This cave is the lair of Cjingolf, one of the two bandit leaders present in the caravan raid in "Witness Protection" (the one with the two-bladed sword). A stone shelf at the back of the cave holds furs for use as a bed, along with an oil lamp and a coal filled brazier.
In the center of the room is a wooden table and chairs. Under the table is a locked chest (the key is on Cjingolf's person) protected by a poison needle trap.
| * Poison Needle Trap: CR 2; mechanical; touch trigger; repair reset; lock bypass (Open Lock DC 30); Atk +17 melee (1 plus poison, needle); poison (blue whinnis, DC 14 Fortitude save resists poison only), 1 Con/unconscious); Search DC 22; Disable Device DC 17. |
Within the chest are six vials of blue whinnis poison (see the trap above), 160 gp, 27 pp, a marble statue of Indolle with gold trim and jasper eyes (450 gp), and a medallion of Celteri.
|
* Medallion of Celteri: This medallion is of a silver chain with a small green stone in the shape of a crescent moon. The stone is made from a piece of the moon Celteri which fell to Therra. Anyone wearing the medallion for 24 hours will be subject to a -1 penalty to Will saves and a +1 resistance bonus to Fortitude saves. Faint transmutation; CL 3; Craft Wondrous Item, curse, bless; 500 gp + 20 XP. |
5. Havingor's Quarters:
This cavern is home to the second in command of the Green Arrows in all matters combat. His official title is Commander, and that is how he is referred to by the men.
The entrance to his quarters is warded by two grey curtains of cloth, one to the south where the passage meets area 3, and another where this same passage enters his quarters proper.
Within is a metal barracks bed, topped with furs stuffed with feathers. Next to that is a metal footlocker that is locked (DC 25, key on Havingor) and holds a faded rolled up portrait of a middle aged woman (his dear mother), a set of very rich noble's clothing (a full outfit including outer garments worth 200 gp), a masterwork hand crossbow and 15 silver crossbow bolts, and a velvet longpouch holding 16 pp and a dozen peridots worth 50 gp each.
Also present it a metal table and two metal chairs. Rolled out upon the table is a map of the region, including the Hag's Lair and the Obelisk.
Marked at a location about 2 miles from the Bandit Lair is a point that is labeled "Twisted Rock". Written next to that are the words "Rendezvous with Raddolf".
A weapon rack hangs from one wall, holding Havingor's weapons plus a halberd, a whip, and a greataxe.
Havingor is a bastard of a man. He enjoys power and lording it over underlings, and is prone to sudden fits of both anger and violence. He punishes insubordination and incompetence severely and expects utter obeisance from those under him. He is also fairly fearless and is never known to have backed down from a fight.
However, he is also brutal, efficient, and clever, and these have allowed him to rise to command the Green Arrows in the field.
|
* Havingor: Male human Rogue 2/Fighter 3; CR 5; Medium humanoid (human); HD 2D6+6 plus 3D10+9; hp 42; Init +2; Spd 20 ft; Space 5 ft; Reach 5 ft; AC 19 (touch 12, flat-footed 17); Atk +8 melee (1D8+3, longsword) or +7 ranged (1D8, longbow); SA sneak attack +1D6; SQ evasion, trapfinding; AL LE; SV Fort +6, Ref +6, Will +3; Str 16, Dex 14, Con 15, Int 12, Wis 10, Cha 12. Height 6 ft 4 in. Skills and Feats: Balance +9, Bluff +6, Climb +11, Diplomacy +5, Intimidate +11, Jump +13, Listen +5, Sense Motive +5, Spot +5, Swim +11, Tumble +9; Combat Reflexes, Dodge, Expertise, Iron Will, Power Attack. Possessions: longsword, chainmail, heavy wooden shield, potion of Bear's Endurance at 3rd level, talisman of pain, longbow, arrows (20), explorer's outfit, belt pouch, whetstone, 30 cp, 24 sp, 25 gp. |
|
* Talisman of Pain: This small talisman is made of cold iron and shaped like a screaming face. When held up and squeezed, the metal bends in half and all those except for the wearer within 30 feet must make a Fortitude save (DC 15) or suffer wracking pains that cause 1D6 non-lethal damage and leave the victim shaken for 1D4 rounds. Once used, the talisman becomes worthless. Faint necromancy; CL 3; Craft Wondrous Item, bane; 300 gp + 12 XP. |
6. Troll Pen:
When the bandits first moved into the area, the troll dwelt near enough to capture and eat a few of the Green Arrows. Wanting to avoid losing more men to hunting the creature down, Aramith took a large force with him and was able to convince the troll that it was better for them to join forces. The troll, seeing a demonstration of group's mages' burning hands spells and alchemist flame flasks held ready in a dozen hands, acquiesced. Contact was made in Giantish, which was one of the languages spoken by Sanili Garimus.
The troll has since benefited nicely from the new arrangements. The bandits make sure it is well fed and given lots of treasure (mostly low value, but the troll is too dim to tell the difference), sometimes tossing a particularly obnoxious merchant to it for sport and dinner.
The cave is actually divided into three parts. None of these are lit by any natural light sources.
The first is the entrance, which stops suddenly at a 15 foot sheer drop to the second portion below.
The second portion is the lower floor of the cave, which extends west from the drop off.
The third potion is the troll's actual den, which is in a cave beneath the first portion. This cave is 20 feet wide and 15 feet deep and 10 feet tall.
The troll usually spends its time in its cave under the entry shelf. Therefore, it is unlikely that PCs entering the area will, at first, even suspect there is a cave under their feet or that a large and fearsome creature dwells within.
A large wooden ladder, 18 feet long and 5 feet wide and made of lashed and interlocking logs, stands on the shelf against the north wall near the drop off. It takes 3 strong men or 4 normal men to lift and maneuver the ladder to place it over the side to descend into the lower portion of the cave.
By no act of cleverness on the part of the troll, he has piled his treasure towards the western portion of the lower floor. This may, unwittingly, act as a lure to greedy PCs to descend the ladder. The pile is mostly copper and includes:
760 cp, 420 sp, two dozen semi-precious stones worth 1D6 gp each, a large chunk of worthless crystal, several human skulls, a bent brass candlestick, two ruined suits of chainmail, and a heavy steel shield embossed with the insignia of House Mercur.
The troll's den under the shelf is smelly and contains cast off bones of various creatures, troll dung, a nest of branches, leaves, fur, and bones, and, of course, a troll.
|
* Troll: CR 5; Large giant; HD 6D8+36; hp 63; Init +2, Spd 30 ft; Space 10 ft; Reach 10 ft; AC 16 (touch 11, flat-footed 14); Atk +9 melee (1D6+6 [x2], claws) and +4 melee (1D6+3, bite); SA rend 2D6+9; SQ darkvision 90 ft, low-light vision, regeneration 5, scent; AL CE; SV Fort +11, Ref +4, Will +3; Str 23, Dex 14, Con 23, Int 6, Wis 9, Cha 6. Height 9 ft. Skills and Feats: Listen +5, Spot +6; Alertness, Iron Will, Track. Special Attacks: Rend (Ex): If a troll hits with both claw attacks, it latches onto the opponent's body and tears the flesh. This attack automatically deals an additional 2D6+9 points of damage. Special Qualities: Regeneration (Ex): Fire and acid deal normal damage to a troll. If a troll loses a limb or body part, the lost portion regrows in 3D6 minutes. The creature can reattach the severed member instantly by holding it to the stump. |
The troll is not technically trapped in his den. Although he has no ranks in the Climb skill, his natural strength gives him a +6 bonus on his Climb checks. The DC to scale the drop off is 15. Thus, it is likely the troll can climb up without too much difficulty.
Along the west wall is a narrow (3 foot wide) opening that is covered by a wooden plank with rocks and dirt stuck to it so that it appears to be a part of the wall. While this secret door will not hold up to tapping or other such methods, it can fool casual observation (Search DC 10 or Spot DC 20 [the latter only if gazing directly at the area]).
Aramith uses this secret door, which the troll cannot fit through, as a potential escape route. Akruba and Sanili know of this passageway, but the rest of the bandits do not.
7. Store Cave:
This cave is used by the bandits to store their booty as it awaits eventual sale to fences (such as the Dwillingir Thieves' Guild). The room is quite full, and includes a lot of non-transportable merchant goods such as bolts of Gerilongi silk, ingots of iron with the stamp of House Mercur upon them, bottles of rare wines, tuns of whale oil, urns of ambergris, Morakki pottery and ceramics, etc. The entire value of the room would top 5000 gp, but would require proper contacts and the means to transport and sell the goods.
Also stored here are spare weapons and armour for the bandits, including throwing axes, swords, studded leather armour, bows, arrows, and basically extra supplies of all of the arms and equipment carried by the bandit archers and footmen. If a precise count is needed, assume two dozen spares of each item (count arrows in groups of 20) are present.
8. Mage's Common:
This cave serves as a common chamber for the bandits' three mages.
A silk curtain with rounded corners and decorated in Gerilongi swirls and circles of silver thread screens entry into this cave.
To the east is a kitchen of sorts, with a brick over to the south whose chimney stops 6 inches short of the ceiling. There is a large oval quartz set into the top of the chimney, seemingly blocking off the pipe. However, this quartz is magicked to absorb smoke from the chimney, allowing cooking to be undertaken here without worrying about venting the smoke. The crystal can absorb about 6 hours of oven-generated smoke per day, and as it does it turns a smoky grey, slowly reverting to clear as it regenerates its capacity. The quartz radiates faint Transmutation magic, but will not function if removed from the chimney.
Shelves along the north wall of the east portion hold boxes of rare spices, herbs, and vintage bottles of wine, brandy, and liqueurs.
There is a nice carpet thrown across the western portion of the floor, which also holds a long wooden table and six cushioned wooden chairs. A candle chandelier of iron and wood hangs over the table. Three place settings of fairly fine china and utensils sit on the table.
Several brass braziers line the walls here, providing warmth.
9. Shadress' Quarters:
This cave belongs to Shadress, the half elf sorceress encountered in "Witness Protection".
A green curtain embroidered with elves shooting arrows out of a large tree screens entry into the place.
Beyond is a simple bedroom, a brown carpet on the floor and a wooden feather bed off against one wall. Along another is a wooden wardrobe that holds a few cloaks and various other traveling clothes suitable for a female.
A large polished steel mirror hangs on the wall, and a small desk holds vellum and a writing set, along with 3 vials of spellbook ink. The desk holds little of value, a personal journal merely describes various raids undertaken by the group as well as her trysts with Gadinfir, and the final pages show shock that Aramith has been captured and then mentions planning for the raid on the prison caravan transporting Aramith and mentions that "Raddolf has assured us that he knows the proper caravan and that Lieutenant Broscus and his men will aid us in the rescue".
A wood and iron chest is under the bed, and is locked (DC 20, key on Shadress). It is mostly empty, but does contain a jumble of coins, including 130 gp and 15 pp.
10. Ilpanay's Quarters:
This cave belongs to Ilpanay, the wizard encountered in "Witness Protection".
A blue curtain embroidered with a bat flying straight towards the viewer screens entry into the place.
This cave has no carpet, and the bed is simply a wooden cot with furs thrown atop it. A table contains charcoal drawings of bats on sheaves of parchment, fairly well done artistically speaking. Several braziers lie dormant along the walls. Shelves on the walls hold several stuffed bats along with a single silver statue of a bat in flight with amethyst eyes (exquisitely rendered and worth 500 gp). Also here are 12 vials of spell ink.
Set upon a wooden podium off to the northwest is a closed tome made of ragged leather whose cover is adorned with a brass tiger's face. This is a spellbook containing the following arcane spells:
Dragonskin
Earthbind
Illusionary Bolt
Vigilant Guardians
Trigger Trap
Blast of Flame
Hidden in a secret compartment at the base of this podium (Search DC 25) is a smallish iron box that contains four panels set into its top. The box is enchanted and may not be opened by any means (even a Knock spell) except by depressing the panels in the proper order or by exposure to an Antimagic Field. The panels are coloured, from left to right, blue, red, green, and orange. They must be pressed in alphabetical order (i.e. blue, green, orange, and red). If pressed in the improper order, the iron box emits a blast of heat that causes 2D6 damage to the person pressing the fourth incorrect panel.
Within the box are 24 pp, 160 gp, and one half of an obsidian bat. This is half of a magic item known as the Bat of the Doomed Ones, a powerful lesser artifact whose second half is currently lost. The exact powers of the item once restored are up to the DM. The bat half radiates strong Necromancy.
11. Sanili's Quarters:
A curtain of woven, multicoloured threads wards entry into a long passageway that eventually emerges into a longish chamber. The main portion of the chamber is taken by an alchemical laboratory, complete with a small table full of alchemical equipment. Shelves along the walls hold various components and ingredients, as well as racks holding alchemical substances that are clearly labeled in Giantish:
5 flasks of alchemist's fire
3 vials of acid
6 bags of scentbreaker
2 vials of felsul flower oil
2 potions of Cure Light Wounds at 1st level
1 potion of Expeditious Retreat at 1st level
3 vials of blue whinnis poison
Also present are notes and tomes from which recipes for the following items can be gleaned:
To the south is a wooden feather bed, adjacent to a wooden wardrobe holding clothing for a man, some of it quite fashionable and expensive (treat as 2 courtier's outfits and 2 noble's outfits).
Nearby is a small table and chair upon which is set a small steel mirror and a porcelain washbasin.
Brass braziers provide warmth by way of red hot coals.
Atop the wardrobe is a small wooden chest that is locked (DC 25, key is on Sanili) and holds 42 sp, 160 gp, 13 pp, a small pouch holding three small sapphires (worth 250 gp each), and a small pouch holding 4 ravenar splinters (worth 125 gp each).
Sanili was born into wealth, the third child of a Heartland noble who was also a senator. As third child, he was expected to tend to the family businesses, but Sanili was restless and was jealous of his elder brothers, who were heir to the nobility and joined the army respectively.
For a while, Sanili was a fop, hanging around bars and pleasure houses before eventually falling in with thieves and using his access to the upper circles of society to aid his fellows. But on a raid into the manse of a rich mark who happened to be a wizard, he and his troupe were discovered and suffered mightily under the mage's spells. His fellows were destroyed or captured, but the mage knew his family and agreed to spare him if he would redirect his life to arcane practice.
This Sanili did, at first begrudgingly but later with full enthusiasm. After years of study, his master proclaimed him ready to leave his tutelage and live a life on the straight and narrow. However, his old restlessness soon reasserted itself and the once-noble came north looking for adventure. He eventually fell in with ne'er-do-wells ad finally joined the Green Arrows.
The wizard has since become a cruel man, interested in accumulating power at the expense of others. He is a proficient alchemist, and brews many of the potions and liquids used by the Green Arrows in their exploits. He is jealous of the other two mages in the group, and views them as upstarts.
|
* Sanili Garimus: Male human Aristocrat 1/Rogue 1/Wizard 4; CR 5; Medium humanoid (human); HD 1D8 plus 1D6 plus 4D4; hp 24; Init +2; Spd 30 ft; Space 5 ft; Reach 5 ft; AC 12 (touch 12, flat-footed 10); Atk +3 melee (1D4+1, dagger) or +4 ranged; SA sneak attack +1D6; SQ trapfinding; AL NE; SV Fort +1, Ref +5, Will +7; Str 12, Dex 15, Con 10, Int 17, Wis 12, Cha 8. Height 6 ft. Skills and Feats: Appraise +6, Bluff +3, Concentration +8, Craft (alchemy) +9, Decipher Script +5, Diplomacy +2, Forgery +7, Gather Information +4, Knowledge (arcana) +9, Knowledge (nobility and royalty) +6, Knowledge (religion) +4, Listen +4, Ride +3, Sense Motive +5, Search +5, Spellcraft +7, Spot +3, Swim +3, Use Magic Item +3; Brew Potion, Combat Casting, Craft Wondrous Item, Dodge, Scribe Scroll. Possessions: dagger, scholar's outfit, spell component pouch, spellbook, potion belt, acid vials (2), alchemist's fire (2), potion of Cure Light Wounds at 1st level, potion of Protection from Arrows at 3rd level, tanglefoot bag, thunderstones (2), scroll organizer, scroll of Fireball at 5th level, scroll of Dispel Magic at 5th level, scroll of Whispering Wind at 3rd level, scroll of Displacement at 5th level, belt pouch, 14 cp, 10 sp, 3 gp, 17 pp. Spells Prepared (4/4/3): 0 - acid splash, daze, ray of frost, resistance; 1 - burning hands, mage armour, magic missile, shield; 2 - levitate, mirror image, web. Base DC = 13 + spell level. Spellbook (19/10/6): 0 - all in PHB; 1 - benign transportation, burning hands, expeditious retreat, identify, lesser sonic orb, mage armour, magic missile, protection from chaos/evil/good/law, shield, shocking grasp; 2 - Aganazzar's scorcher, glittering robe, levitate, mirror image, spider climb, web. |
12. Akruba's Quarters:
This cavern sits astride the main north-south passage of this level and the barracks (area 3). It is accessed by way of two curtained passages, these curtains being of blue Gerilongi silk, now dirty with the dust of the lair.
Within is a deep cavern that holds a long wooden table and chairs in the northern half of the place, and a wooden feather bed and a wooden wardrobe in the southern half. Several braziers dot the place.
The wardrobe contains female clothing, mostly rugged outdoor clothing, but also including a few peasant dresses, and a few that can only be described as harlot's outfits. A locked wooden box on a shelf in the wardrobe (DC 20, key on Akruba) holds a variety of jewelry, including rings, necklaces, earrings, pendants, brooches, etc. None of these are magical and all are decent examples of costume jewelry, worth a total of 50 gp. Next to the box are three disguise kits, one of which is a masterwork kit with 3 uses left.
A hidden panel in the back of the wardrobe (Search DC 25) holds a large leather pouch with 200 cp, 160 sp, 45 gp, and 14 pp. Also here is a coil of silk rope that is an animated rope.
|
* Animated Rope: This coil of silk rope is 50 ft in length. When held, the rope can be commanded to animate 3/day as if under the effects of an animate rope spell cast by a 1st level caster. Faint Transmutation; CL 3; Craft Wondrous Item, animate rope; Cost: 1200 gp + 48 XP. |
Akruba is a wily woman who has ambitions to take over the Green Arrows in the wake of Aramith's capture. As such, she is secretly hoping that Aramith is brought to justice in Dwillingir and that the rescue attempt fails. To this end, she has done her best to subtly lessen the size of the rescue force, claiming that a strong guard needed to remain at the lair in case the Imperials should launch a raid upon them.
She feels that Sanili is her most likely rival to run the Green Arrows in Aramith's stead, and she might see fit to having him killed soon.
|
* Akruba: Female human Rogue 2/Fighter 1/Swashbuckler 3; CR 6; HD 2D6+2 plus 1D10+1 plus 3D10+3; hp 43; Init +4; Spd 30 ft; Space 5 ft; Reach 5 ft; AC 18 (touch 16, flat-footed 14); Atk +10 melee (1D6+1, masterwork rapier) or +8 melee (1D6+1, masterwork rapier) and +7 melee (1D4, dagger) or +9 ranged (1D4+1, dagger); SA sneak attack +1D6, insightful strike +3; SQ evasion, trapfinding, grace +1; AL CN; SV Fort +6, Ref +8, Will +1; Str 12, Dex 19, Con 13, Int 16, Wis 10, Cha 13. Height 5 ft 5 in. Skills and Feats: Appraise +5, Balance +10, Bluff +8, Climb +8, Diplomacy +6, Disguise +6, Escape Artist +6, Gather Information +3, Hide +8, Intimidate +6, Jump +10, Listen +5, Move Silently +8, Open Lock +8, Ride +7, Search +5, Sense Motive +4, Sleight of Hand +8, Spot +5, Survival +1, Swim +4, Tumble +14, Use Rope +6; Dodge, Mobility, Spring Attack, Two-Weapon Defense, Two-Weapon Fighting, Weapon Finesse. Possessions: masterwork rapier, daggers (8), leather armour, bracers of deflection +2, bandoleer, potion belt, potion of Cure Moderate Wounds at 3rd level, potion of Expeditious Retreat at 1st level, potion of Cat's Grace at 3rd level, potion of Invisibility at 3rd level, potion of Blur at 3rd level, amulet of leaping, traveller's outfit, belt pouch, 13 sp, 44 gp, 22 pp. Special Attacks: Insightful Strike (Ex): May add Int bonus to damage rolls with a light weapon or a weapon subject to Weapon Finesse if wearing light or no armour and if carrying a light or no burden. Targets immune to criticals are immune to this extra damage. |
|
* Bracers of Deflection: These bracers operate exactly like a ring of protection. Faint abjuration; CL 5; Craft Wondrous Item, shield of faith; Price 8000 gp + 320 XP. |
|
* Amulet of Leaping: This amulet is made of jade and carved into the shape of a toad. When worn, the wearer receives the benefit of a jump spell as if cast by a 1st level caster. Faint transmutation; CL 3; Craft Wondrous Item, jump; Cost: 3000 gp + 120 XP. |
13. Gadinfir's Quarters:
This chamber belongs to Gadinfir, who is currently residing in area 6 of the Ground level. As such, the place contains a wooden bed, a table and chairs, a weapon rack, and several brass braziers for warmth. Pelts and furs line the walls, and a large bear rug is splayed across the floor.
14. Aramith's Common:
A large, thick curtain blocks the way into this chamber from the south. The curtain is Gerilongi silk, dyed red and green and set with crystal beads.
Within is a large cave that contains a long wooden table and half a dozen chairs. Under the table and chairs is a fine red carpet of Xydlonti weave. Several goblets and services of copper and silver are set on the table, though they do not show any signs of recent use.
In a niche to the southwest the walls are of polished quartz, seemingly in its natural location embedded into the walls, and hanging in the back of the niche is a silver mirror 3 ft wide by 5 ft tall.
Along the north wall is a fine curio cabinet flanked by shelves set into the cavern wall. The cabinet holds bottles of wine, a bejeweled golden goblet set with rubies and jacinth (worth 450 gp), and various porcelain vases and dishes and bowls painted with intricate blue paintings that originated in Amabong (worth a total of 300 gp).
To the southeast is a stone hearth, which chimney emerges into the centre of a tree to the north of the entrance to the lair and filters out amongst the eaves of the tree, thereby disguising the smoke and dispersing it from casual observation. The hearth shows no sign of use in the past few weeks.
The other bandit leaders have not dared to take up residence in Aramith's lair, for such a bold move would bring things to a head and possibly spark a brutal fight for supremacy in the group. Thus, the place simply awaits the return of Aramith or the installation of a new master.
15. Aramith's Quarters:
A fine silk curtain of yellow-green embroidered with silver thread forming intricate rounded geometric patterns in the Gerilongi style hangs over the entrance to this area from area 14.
Within is the sleeping chamber of Aramith. A plush wooden feather bed rests in the far east of the chamber, with a slightly battered wooden armoire and wardrobe nearby that was likely at one time very expensive and adorned with wonderfully intricate carvings of sailing ships and stormy seas, but has seen, apparently, some better times in the past. The unit holds a great variety of clothing, all of it Aramith's, including traveling clothes, cold weather clothing, scholar's outfits, peasant garb, courtier's outfits, noble's outfits, several clerical frocks, robes, cloaks, a variety of boots, etc. It should be clear that Aramith often went about in various guises.
A small chest, unlocked, rests near the armoire. When opened, shelves fold out of the lid, exposing a variety of gems and jewels that are very good forgeries to compliment a variety of disguises. As gems and jewels these are pretty much valueless, but possession of the whole set will grant the owner a +2 circumstance bonus to Disguise checks where the disguise can be complimented by fine adornment. The bottom of the chest holds the equivalent of 10 masterwork disguise kits.
The bed itself is nice but unremarkable. However, brackets attached to the underside hold a loaded light crossbow with a bolt in it. Anyone searching under the bed unaware of the crossbow has a chance of accidentally setting it off, possibly shooting himself. Assume a 15% chance of setting it off, and a further 50% chance the bolt flies near enough to make an attack roll at +6. The bolt does normal damage for a light crossbow (1D8).
West of the bed and armoire is a carpeted area that holds two velvet couches and a large coal brazier, now empty. In a niche to the south is a chair and desk, the latter obviously lifted from some wealthy noble, for it is of fine mahogany and contains carvings of merchant caravans traveling up and down its sides. Several vials of ink, quill pens, bags of sand, and a blotter are on the desk, along with stacks of vellum, parchment, and several books. The desk has several drawers that also contain various documents, books, and ledgers.
Searching through and examining the contents of the desk will reveal the following:
1. The Green Arrows have been hitting many Mercur caravans in order to capture iron ingots, which currently command inflated prices.
2. Aramith seemed to be worried how to fence the iron his group captured, as he didn't think Raddolf could handle what he has captured.
3. Aramith seemed to believe that Terraf's recent visit to the Province was to warn the Imperial Governor to either a) reign in the activity of the Green Arrows and break up the group or b) to break the siege of the orcs upon the dwarves.
4. Ledgers record years of activity of the group, including rosters of new members, deaths of old, background checks on group members, a few indications of members being "eliminated", records of successful banditry and inventories of what had been captured and how it was fenced and how the proceeds were divided amongst the members. Careful examination will reveal that the Green Arrows has been in existence for about 8 years, and that their depredations were fairly evenly distributed amongst the local Merchant Houses until some 3 years ago, in NS 20, the attacks against House Riverine caravans seem to taper off slightly and, with a successful Intelligence check (DC 15), it can be noted that the monetary value of the raids against Riverine caravans has fallen precipitously (i.e. the raids against Riverine seem to be significantly less productive in terms of wealth gained for the group than for raids upon other Houses).
5. In the ledgers, one particular raid against a House Riverine caravan conducted in mid NS 21 has a scrawled note by it that reads: "Raided by mistake. Raddolf is going to be extremely enraged. Must use the bands immediately to smooth over the situation."
6. A small map shows the surrounding forest. It shows the Obelisk and shows the Hag's Lair, both clearly marked as such. It also shows, similar to the map in area 5, the location of the Twisted Rock and a label pointing to the map area reads "Raddolf's bands."
In a small iron box contained in one drawer of the desk are three purple cloth bands about 2 inches wide and 2 feet long. Embroidered in golden thread are the following, one phrase on each band:
"Meet me at the Twisted Rock in two days"
"I will meet you at the designated location in ten days"
"Message received"
These are used to contact Raddolf, of the Dwillingir Thieves' Guild. Refer to the "Dealing with Raddolf" section below for further details.
Hidden behind the heavy desk (Search DC 20) is a niche in the cave walls. The niche is warded by a scything blade trap. The trap will activate when anything is passed across the plane of the opening of the niche, for tiny filaments cover the opening and immediately contract when touched, releasing the scythe. The momentum of the scythe then resets the filaments. A switch hidden in the wall nearby can be used to deactivate and reactivate the trap.
| * Scythe Trap: CR 4; mechanical; location trigger; automatic reset; hidden switch bypass (Search DC 25); Atk +20 melee (2D4+8/x4, scythe); Search DC 21; Disable Device DC 18. |
The niche holds several cloth bags containing 270 gp, 100 pp, and several pouches of small gems worth a total of 160 gp. Also here is a magic scroll containing three arcane spells: Dimension Door (7th level), Invisibility (5th level), and Fly (6th level). Also here is a map of a section of Dwillingir. The map marks the location of the Rolling Lady Inn and indicates a secret door in the rear that leads down to a cellar.
16. Aramith's Private Chamber:
Warded by a thick linen curtain of ashen grey, this area serves as Aramith's personal storage area. The room is warded by a spiked pit trap that covers the two 5 ft squares that are ten feet into the chamber past the curtain. The trap can be bypassed by simply stepping across the southern edge of the pit to the south.
The pit is covered by thin wooden boards painted grey and covered with small rocks and other loose debris so that it matches the cave floor well.
| * Spiked Pit Trap: CR 5; mechanical; location trigger; manual reset; DC 25 Reflex save avoids; 40 ft deep (4D6 fall); multiple targets (first target in each of two adjacent 5 ft squares); pit spikes (Atk +10 melee, 1D4 spikes per target for 1D4+4 each); Search DC 21; Disable Device DC 20). |
At the west end of the place is a narrow passageway that twists south and eventually emerges into area 6 (the Troll Pen) as a hidden door (which is visible from this side).
Between the pit trap and the western passage are the personal booty items of Aramith. These include:
Defense of the Lower Level:
The masters of this place are not fools. They are crafty survivors who are inured to a life of danger and conflict. As such, they will use every wile at their disposal to repel invaders. This includes available themselves of alchemical items in Sanili's laboratory (area 11) and rallying the troll (area 6). They will certainly use the cross passages through area 12 and the circular nature of the level as a whole to retreat and flank invaders, and are not above retreating en masse if the situation looks hopeless.
If news of trouble from above reaches here, at least half of the force in area 3 will be sent upward along with Havingor, while the rest prepare ambushes down below.
Overall Defense:
Overall, should the PCs retreat before finishing their assault, the bandits will take action as appropriate. They will almost certainly figure that Aramith has spilled the beans (likely under intense torture), and that the PCs have been sent by the Imperator to roust them out. They will fully understand that their hideout has been compromised, and so the most likely strategy they will adopt is to gather up, find the PCs' resting place, launch a vicious assault, and then assume that further Imperial retaliation will be forthcoming and abandon the place.
Part Four - Dealing with Raddolf:
Raddolf is mentioned at various points in the text above. It is likely the PCs will wish to travel to the Twisted Rock mentioned in the notes of Havingor or Aramith.
Raddolf is a high level contact within the Dwillingir Thieves' Guild. He is also the liaison between the Guild and the Green Arrows. He is a mage who uses the spell Scrying to make contact with Aramith.
Basically, the plan is as follows:
Aramith places a captive animal in a cage hung from the Twisted Rock. Next to the cage is a small tree. He sends a bit of fur of the creature or a feather to Raddolf in Dwillingir. When he and Raddolf need to meet, Aramith ties one of the purple bands hidden in his chamber (area 15) around the small tree.
Every day, Raddolf scries the captive animal. In doing so, he can also see the purple band and read the message thereupon. He reacts accordingly, either traveling to the Twisted Rock on his griffon steed, or preparing to meet Aramith in Dwillingir in the basement of the Rolling Lady Inn.
The Twisted Rock is some 2 miles from the Bandit Lair, to the east. In a small boulder and scrub-strewn clearing (approximately 200 feet in diameter) atop a hillock is a strangely twisted rock, some 12 feet tall and approximately 8 feet in diameter. It appears as if the rock were somehow changed to clay and then a giant hand pulled it up and twisted it clockwise before allowing it to harden into granite once again.
Whatever its origins, spiked into the side of the rock is an iron cage that currently holds an iguana-sized lizard. The cage and the lizard are remarkably self-sufficient. A channel cut into the side of the rock channels rain water falling on the top of the Twisted Rock, which falls down the natural spiral grooves of the rock and into the channel, into a metal bowl built into the cage. Local rains and dew are enough to keep the bowl full of water in perpetuity. Meanwhile, the side of the rock near the cage is covered with a sticky, sweet-smelling paper that is covered with insects. This flypaper uses its cloying scent to attract insects, which are then trapped. The lizard's tongue can easily reach the insects, and the glue is not strong enough to stick the tongue to the paper.
The bottom of the cage is mesh, so that waste and urine can pass through to the forest floor below.
The cage is hung about ten feet up the rock, out of the reach of most predators, but a wooden ladder is hidden in the nearby underbrush (Search DC 18 or Spot DC 23) that is 12 feet tall.
A small tree grows next to the rock, and its birch trunk rises three feet above the top of the rock before sprouting out into branches and leaves. About four feet up the thin trunk can be seen some discoloured markings about the same size as the purple bands. This is, in fact, where the bands are tied.
A dire badger has recently (in the last week or so), arrived in the area. It has tried to get to the lizard, and being irascible, refuses to leave. Instead it has dug a den nearby and now considers this clearing its new home. It will not be pleased to find the PCs invading the area.
|
* Dire Badger: CR 2; Medium animal; HD 3D8+15; hp 32; Init +3; Spd 30 ft, burrow 10 ft; Space 5 ft; Reach 5 ft; AC 16 (touch 13, flat-footed 13); Atk +4 melee (1D4+2 [x2], claws) and -1 melee (1D6+1, bite); SA rage; SQ low-light vision, scent; AL N; SV Fort +7, Ref +6, Will +4; Str 14, Dex 17, Con 19, Int 2, Wis 12, Cha 10; Length 7 ft. Skills and Feats: Listen +6, Spot +6; Alertness, Toughness, Track. |
Raddolf will scan the area every day at around 2 PM. He scans the lizard, which has a Will save of +1. Raddolf's scrying has a DC of 17, so he can usually successfully scry the lizard. Nonetheless, the DM can roll the save.
In any event, if Raddolf sees nothing amiss in the area, he will simply scan the next day. If he sees a purple band, he will act accordingly. If he sees the band summoning him to the clearing, he will come (see below). If he sees the band telling him of Aramith's impending arrival, then he will arrange to meet him below the Rolling Lady Inn in Dwillingir. If he sees the "message received" band, he will be quite confused.
In any event, reception of any band will likely convince him that either Aramith has escaped imprisonment or (assuming Aramith was transported to Dwillingir and tried) that one of the other bandit leaders is attempting to contact him.
If Raddolf scries and sees the PCs, then he will alert his masters in the Dwillingir Thieves' Guild and they will react accordingly (refer to the scenario "To Catch a Thief").
The Arrival of Raddolf:
Raddolf, should he be summoned to the clearing, will arrive on his griffon. He will not be especially wary, though he is no fool either. But he is confident in his abilities, and that could be his undoing.
Raddolf leaves Dwillingir invisible, as is his griffon, so as to avoid attention. By the time the invisibility wears off, he and his mount are far from Dwillingir and high above the ground. The mage then flies to the forest and, using the trees as cover, lands invisibly the following day a few miles from the Twisted Rock. He then rides his mount to the site. Normal weather permitting, he arrives usually in the late afternoon of the second day after the band is tied around the tree.
Approaching the site, he will dismount a few hundred feet from the clearing, in the forest, and approach on foot. The griffon will, ostensibly, be free to roam around the forest near the clearing to relax and catch some animals to snack upon. This will place the griffon some 2D100 feet from the clearing at any given time. He expects to find Aramith or another of the Green Arrows waiting for him near the rock.
Raddolf will have mage armour cast as he approaches the site. This is standard for him whenever he is on the ground. He has cast his two invisibility spells more than a half hour before, so they are expired. As the mage is not expecting trouble (or he would not have come out here), he will not have any other spells up.
Raddolf is a very smart man. He will not fight to the death, and he will not fight a battle he feels he cannot win with a good degree of confidence. This is reflected in many of his spell preparation choices and magic items (which are also optimized for mounted aerial combat), many of which are designed to allow him to flee combat. However, he is a fairly powerful mage and he knows that his griffon is nearby.
If he is taken by surprise, the mage will likely first use dimension door to get some distance between him and his foes. This will then allow him to shout out for his griffon and cast shield and protection from arrows if necessary. Black tentacles is a favourite of his, as it will slow down charging warriors.
Nonetheless, he is not a bloodthirsty man, as indicated by his alignment, and he certainly would be inclined to try to figure out who the PCs are and what they want and what they have done to the Green Arrows. Raddolf believes that his master, the head of the Dwillingir Thieves' Guild, has an arrangement with Trade Lord Barnabus of House Riverine, and so if he determines that the PCs are of House Riverine, he almost certainly will not destroy them once they are in his power (i.e. unconscious, etc.). He would possibly even bind their wounds if he could do so in safety.
It is up to the DM's discretion whether Raddolf would recognize any of the PCs by sight as members of House Riverine. Certainly, this will not happen during the first several rounds of combat. But after that, the DM can have Raddolf recognize the PCs as Riverine agents. Once this happens, Raddolf's only desire will be to flee back to Dwillingir as quickly as he can to report to his master.
|
* Raddolf: Male human Rogue 1/Wizard 7; CR 8; Medium humanoid (human); HD 1D6 plus 7D4; hp 27; Init +2; Spd 30 ft; Space 5 ft; Reach 5 ft; AC 12 (touch 12, flat-footed 10); Atk +3 melee (1D6; quarterstaff) or +5 ranged (1D8, light crossbow); SA sneak attack +1D6; SQ trapfinding, familiar abilities (alertness, share spells, empathic link); AL N; SV Fort +5, Ref +7, Will +8; Str 11, Con 10, Dex 15, Int 18, Wis 14, Cha 12. Height 5 ft 8 in. Skills and Feats: Appraise +6, Concentration +11, Craft (alchemy) +5, Decipher Script +7, Diplomacy +6, Disable Device +8, Forgery +8, Gather Information +5, Hide +6, Intimidate +6, Jump +2, Knowledge (arcana) +12, Listen +10, Move Silently +6, Ride +6, Search +6, Spellcraft +14, Spot +10, Tumble +8; Combat Casting, Combat Expertise, Dodge, Mounted Casting, Mounted Combat, Scribe Scroll. Possessions: quarterstaff, cloak of resistance +1, wand of Acid Arrow at 3rd level with 26 charges remaining, dimensional prism, potion of Cure Moderate Wounds at 3rd level, oil of Magic Weapon at 1st level, potion of Blur at 3rd level, potion of Heroism at 5th level, flasks of alchemical fire (2), masterwork potion belt, scroll of Fly at 5th level, scroll of Dimension Door at 7th level, scroll of Dispel Magic and Suggestion at 5th level, scroll of Disguise Self at 3rd level, scroll of Knock at 3rd level, scroll of Whispering Wind at 3rd level, scroll organizer, spellbooks (2), spell component pouch, belt pouch, traveller's outfit, golden necklace studded with carnelian worth 250 gp, Raddolf's signet ring, 130 cp, 120 sp, 47 gp, 10 pp. Spells Prepared (4/5/4/3/2): 0 - acid splash, daze, detect magic, light; 1 - feather fall, mage armour [cast], magic missile (2), shield; 2 - invisibility (2) [used], protection from arrows, scorching ray; 3 - dispel magic, fireball, fly; 4 - black tentacles, dimension door. Base DC = 14 + spell level. Spellbook (20/16/11/8/4): 0 - all from the PHB plus repair minor damage; 1 - alarm, benign transposition, charm person, detect secret door, disguise self, feather fall, guiding light, identify, mage armour, magic missile, magic weapon, repair light damage, shield, silent image, sleep, unseen servant; 2 - arcane lock, blur, detect thoughts, invisibility, knock, locate object, minor image, misdirection, protection from arrows, scorching ray, whispering wind; 3 - animate dead, dispel magic, fireball, fly, heroism, legion's curse of impending blades, nondetection, suggestion; 4 - black tentacles, dimension door, lesser geas, scrying. |
| * Raddolf's Signet Ring: This golden ring is encrusted with jade and turquoise worth 75 gp that can be manipulated so that the setting turns over to reveal a signet ring with a strange rune (the rune of the Dwillingir Thieves' Guild). It requires a Search check (DC 25) to notice that the setting can be flipped. |
|
* Raddolf's Rat Familiar: CR 1/8; Tiny animal; HD ¼ (7); hp 13; Init +2; Spd 15 ft, climb 15 ft, swim 15 ft; Space 2.5 ft; Reach 0 ft; AC 18 (touch 14, flat-footed 16); Atk +6 melee (1D4-3, bite); SQ familiar abilities (improved evasion, share spells, empathic link, deliver touch spells, speak with master, speak with rats), low-light vision, scent; AL N; SV Fort +2, Ref +6, Will +6; Str 2, Dex 15, Con 10, Int 9, Wis 12, Cha 2. Length 1 ft 6 in. Skills and Feats: Balance +10, Climb +12, Hide +14, Listen +7, Move Silently +10, Search +1, Spot +7, Swim +10, Tumble +8; Weapon Finesse. |
|
* Raddolf's Griffon Steed: CR 4; Large magical beast; HD 7D10+21; hp 67; Init +2; Spd 30 ft, fly 80 ft (average); Space 10 ft; Reach 5 ft; AC 17 (touch 11, flat-footed 15); Atk +11 melee (2D6+4, bite) and +8 melee (1D4+2 [x2], claws); SA pounce, rake 1D6+2; SQ darkvision 60 ft, low-light vision, scent; AL N; SV Fort +8, Ref +7, Will +5; Str 18, Dex 15, Con 16, Int 5, Wis 13, Cha 8. Length 8 ft. Skills and Feats: Jump +8, Listen +6, Spot +10; Iron Will, Multiattack, Weapon Focus (bite). Possessions: exotic military saddle, saddlebags, bit and bridle, potion of Cure Moderate Wounds at 3rd level, rations (14), waterskins (4). |
Part Five - Finishing the Adventure:
Once the Green Arrows have been disbursed (and win or lose in the assault, they will realize their lair has been compromised and will flee the area) their effectiveness as a band will be at an end. With Aramith either executed or dead or fled into hiding, the group will disperse, each member going his separate way.
Of course, this does not mean the ex-Green Arrows won't potentially remain active in the province. They might join other groups or form new groups of their own. Some might bear a grudge against the PCs…especially the more evil members of the group.
Returning to Dwillingir, the PCs will be thanked by the Imperator and will be allowed to keep any booty they received. Unfortunately, any booty left behind will likely be gone by the time the PCs return, even from as near as Spiralle. Only if the PCs leave a guard in the lair do they have any hope of returning to cart out more goods, and in this case the DM is encouraged to have wandering denizens of the area explore the newly abandoned caves and possibly try to oust the PCs who are guarding the complex to either claim it as their own or to at least gain the remaining treasure.
How the False Barnabus reacts to the PCs' actions is covered in detail in the final scenario in the Green Arrow cycle "To Catch a Thief". Refer to that scenario for the various reactions of various parties to the various outcomes of this scenario.
Experience:
In addition to normal experience (which in Therra is half of that recommended in the DMG), each party member should be rewarded as follows:
Return to the Therran Scenario Page